http://processors.wiki.ti.com/index.php/Msp430lamp
In particular, the LED clock segments shine through a wood veneer, so when the display is off it looks like the base is solid wood.

Wednesday, December 22, 2010
Monday, November 1, 2010
Floating Shelf / Hidden Drawer Complete
The home theater floating shelf is done. I think it turned out pretty well. I need to do some serious cable organization to clean it up, though. I'd also like to find a better home for the HDTV antenna, or perhaps find a more compact antenna to hide behind the TV.


Thursday, October 28, 2010
Floating Shelf / Hidden Drawer in progress
I've been playing with different ideas on how to mount my blu-ray player / home theater amp. Since I mounted the TV on a nice floating arm, I thought doing something similar for the electronics would be nice. The problem is, where do you put all of the cables, power strips, etc? I don't have the option of putting everything inside of the wall cavity since the wall I'm mounting it to is brick.
After seeing some nice floating shelves for books, I thought a neat solution would be to construct a floating shelf, and conceal all the unsightly bits within the floating shelf. To provide access to the storage space, I used some ball bearing drawer slides to create a "inside-out" drawer. The "cabinet" moves, and the blu-ray player will sit on top. The power strips and cables will remain concealed inside of the stationary "drawer" which will be rigidly bolted to the wall. My work in progress is pictured below. Note I do not yet have the front of the shelf attached. I'll sand, prime and paint it once complete to match the fireplace mantle color. It should be rock solid when complete. Every joint is both glued and screwed or nailed together. The interior structural components (in particular the joint between the wall plate and the drawer sides) are all screwed and glued. The visible cosmetic joints are nailed and glued.
Materials used:
The ball bearing slides are quite nice and reasonably priced. $11 or so at Home Depot. There is very little slop in them- I think they might be suitable for use in a home CNC machine as inexpensive ways.
After seeing some nice floating shelves for books, I thought a neat solution would be to construct a floating shelf, and conceal all the unsightly bits within the floating shelf. To provide access to the storage space, I used some ball bearing drawer slides to create a "inside-out" drawer. The "cabinet" moves, and the blu-ray player will sit on top. The power strips and cables will remain concealed inside of the stationary "drawer" which will be rigidly bolted to the wall. My work in progress is pictured below. Note I do not yet have the front of the shelf attached. I'll sand, prime and paint it once complete to match the fireplace mantle color. It should be rock solid when complete. Every joint is both glued and screwed or nailed together. The interior structural components (in particular the joint between the wall plate and the drawer sides) are all screwed and glued. The visible cosmetic joints are nailed and glued.
Materials used:
- 3/4" oak veneer plywood for exterior shelf components
- 3/4" sanded plywood for interior drawer components
- 14" ball bearing drawer slides
- misc. screws, finish nails, and wood glue
 |
| Floating shelf as closed (front is not yet attached) |
 |
| Floating Shelf as open |
The ball bearing slides are quite nice and reasonably priced. $11 or so at Home Depot. There is very little slop in them- I think they might be suitable for use in a home CNC machine as inexpensive ways.
Thursday, October 21, 2010
Supercub Flight Report
SK 35-30 1400kV motor with the Custom RC Parts motor mount and a 9x6 APC prop is superb in the Supercub. Much, much more power, very smooth running, and the flight dynamics do not seem to be noticeably upset.
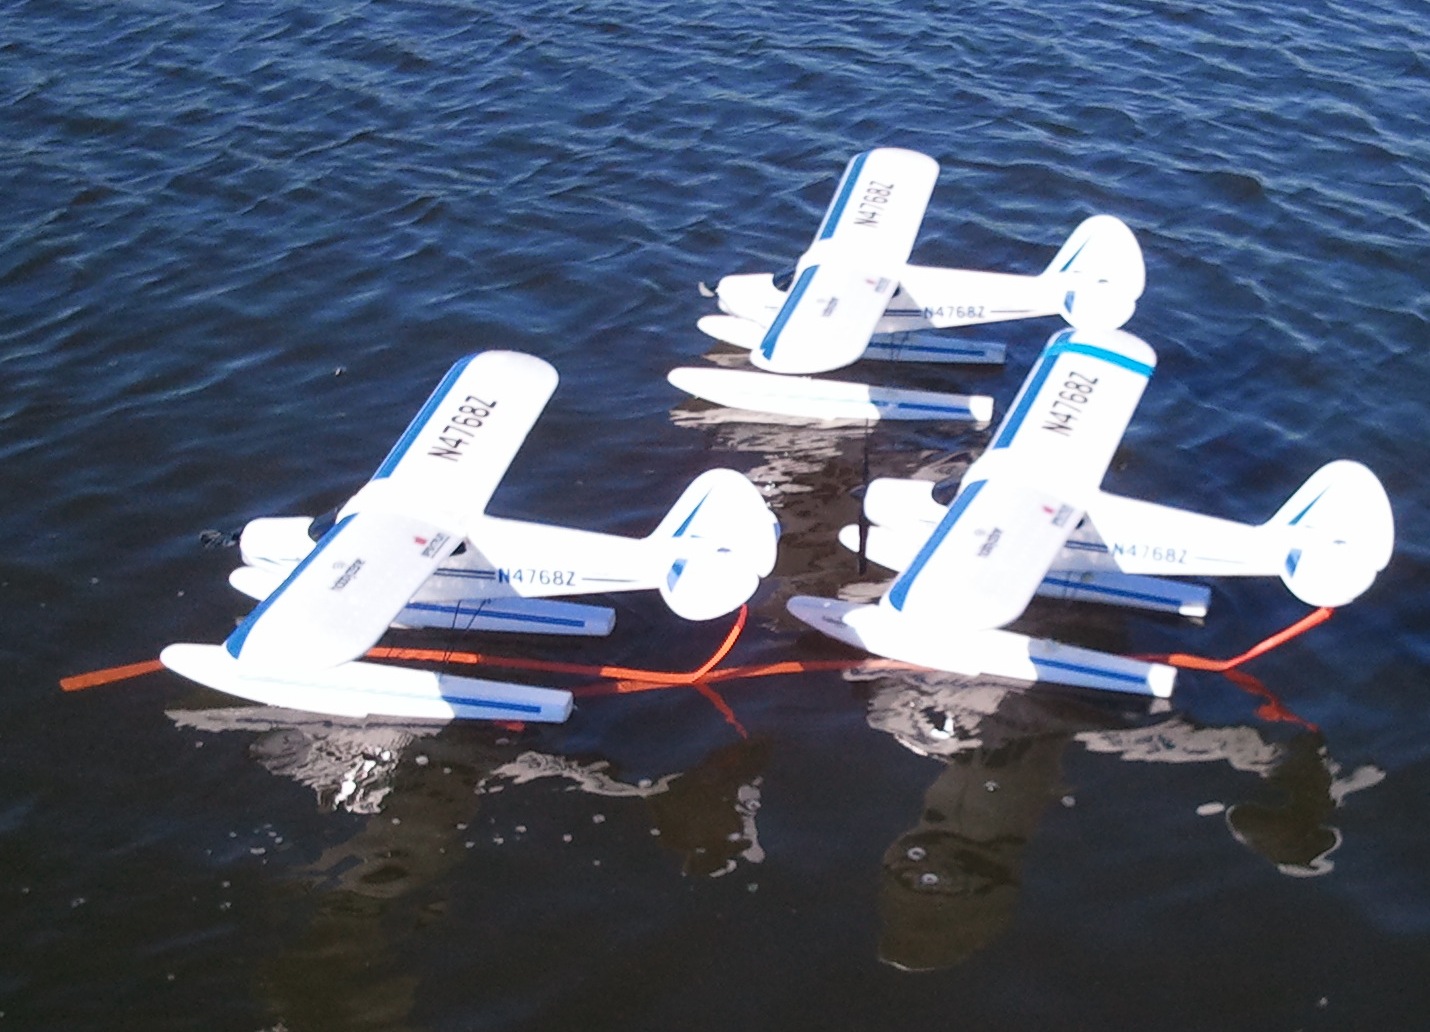
The new water rudder worked great- for a while. Then water infiltrated the housing and started shorting it out. I had to disconnect it after the first flight. Hopefully the servo will dry out and work again. If so, I'll try waterproofing it with some bicycle bearing grease and try again.
The new water rudder worked great- for a while. Then water infiltrated the housing and started shorting it out. I had to disconnect it after the first flight. Hopefully the servo will dry out and work again. If so, I'll try waterproofing it with some bicycle bearing grease and try again.
Supercub Updates
Last Friday I had the oppotunity to fly the supercub off of Kai's pontoon boat. Kai and his brother also flew- three nearly identical floatplanes in the air at once made for some good fun. However, one of the gearbox components in my plane failed. While it would still fly, it vibrated horribly and would undoubtably eventually cause some fatigue failures.
Luckily, I had ordered a motor and motor mount several months ago for this eventuality. Last night I installed a Turnigy SK 3530 1400kv. Since the Supercub came with all-in-one receiver and brushed motor ESC, I had to add an external brushless ESC. I chose an old E-flite 30A that was left over from my first T-28, RIP. The only prop I had on hand that would be even close to approriate was a 9x6. With a 20c 2200 mAh battery it pulled 36.5A. A little high, but since I rarely fly full throttle for any amount of time I felt it would work until I puchase a more appropriate prop. I think a 10x5 or 10x4 might be a good choice.

As long as I had the airplane torn apart, I used the opportunity to add a water rudder. I had a very nice plastic water rudder left over from the set of coroplast floats I had purchased on E-bay for my old 0.40 gas trainer. While those floats and the gas aircraft are long gone (sold on craigslist), I held on to the water rudder since it looked like a nice piece of hardware. I cut a pocket into the left float for an old servo, used a left-over pushrod and clevis, and we're in business. I'm excited to see how it handles both in the water and in the air now.

 |
| Photo Courtsey of Kai |
Luckily, I had ordered a motor and motor mount several months ago for this eventuality. Last night I installed a Turnigy SK 3530 1400kv. Since the Supercub came with all-in-one receiver and brushed motor ESC, I had to add an external brushless ESC. I chose an old E-flite 30A that was left over from my first T-28, RIP. The only prop I had on hand that would be even close to approriate was a 9x6. With a 20c 2200 mAh battery it pulled 36.5A. A little high, but since I rarely fly full throttle for any amount of time I felt it would work until I puchase a more appropriate prop. I think a 10x5 or 10x4 might be a good choice.

As long as I had the airplane torn apart, I used the opportunity to add a water rudder. I had a very nice plastic water rudder left over from the set of coroplast floats I had purchased on E-bay for my old 0.40 gas trainer. While those floats and the gas aircraft are long gone (sold on craigslist), I held on to the water rudder since it looked like a nice piece of hardware. I cut a pocket into the left float for an old servo, used a left-over pushrod and clevis, and we're in business. I'm excited to see how it handles both in the water and in the air now.

Sunday, October 17, 2010
Home Made Front & Center Channel Speaker Mounts
This past week I mounted our family room TV to the brick fireplace surround. We used a Kanto TV mount from Costco- I'd highly recommend it. Very sturdy, high quality construction at a great price. The next problem was how to mount the right, left, and center channel speakers. They could be rigidly fixed to the wall, but that didn't seem like an elegant solution. My neighbor mounted his center channel speaker to the TV mount. After seeing his setup, I thought it would be nice to take it to the next level and mount all front channel speakers to the TV. They'll pivot with the TV and be out of the way.
Initially I was thinking of using 1/2" galvanized steel electrical conduit and crimping the ends to form mounting locations. This construction technique was introduced to me by John for use on his solid-fuel rocket test stands. While I was at Lowes preparing to buy the materials, I noticed some nifty plastic clamps meant to anchor plastic conduit to the wall. I realized these would make ideal mounts for the speakers. The PVC conduit was also much cheaper than the galvanized steel. Since my speakers are the cheap (i.e. light) Sony's included in a "home theater in a box", the 1/2" PVC pipe will be plenty strong enough.
Materials used:
If I were to do it again, I'd probably cap the ends of the tubing for a more finished look on the center channel mount. I'd also look at using black ABS irrigation pipe or other black pipe, again for a better look. However, you really can't see the tubing / fittings unless you look behind the TV.
Completed view of TV front:

Assembly behind TV:

Center Channel Speaker Mount:

Right and Left Speaker Mounts:

Initially I was thinking of using 1/2" galvanized steel electrical conduit and crimping the ends to form mounting locations. This construction technique was introduced to me by John for use on his solid-fuel rocket test stands. While I was at Lowes preparing to buy the materials, I noticed some nifty plastic clamps meant to anchor plastic conduit to the wall. I realized these would make ideal mounts for the speakers. The PVC conduit was also much cheaper than the galvanized steel. Since my speakers are the cheap (i.e. light) Sony's included in a "home theater in a box", the 1/2" PVC pipe will be plenty strong enough.
Materials used:
- 2x 4' 1/2" PVC conduit
- 2x PVC "T" joint
- 2x PVC elbow joint
- 2x PVC connector (not necessary if you cut the conduit to the right length the first time)
- 4x PVC conduit mounting clip
If I were to do it again, I'd probably cap the ends of the tubing for a more finished look on the center channel mount. I'd also look at using black ABS irrigation pipe or other black pipe, again for a better look. However, you really can't see the tubing / fittings unless you look behind the TV.
Completed view of TV front:

Assembly behind TV:

Center Channel Speaker Mount:

Right and Left Speaker Mounts:

Saturday, October 2, 2010
Wednesday, September 22, 2010
Initial Wiring of Single Axis Robot
All of the materials finished arriving yesterday for the single axis robot. This is a work project, essentially building a low-cost semi-automated test machine. I won't get into the exact purpose, but the materials used and programming will be a great stepping stone into a home-built CNC mill / router.
Materials used:
One interesting thing I found is that the stock knock-outs in the galvanized steel box cover fit the emergency stop panel mount diameter just perfectly.


Materials used:
- 36" ball bearing slide with belt drive system & stepper motor, from e-bay
- Stepper motor power supply: 16034PS 36V 4.2A, from mpja.com
- Stepper drive: Geckodrive G251 from kelinginc.net
- microcontroller: Arduino from hacktronics
- display: LCD arduino kit from hacktronics
One interesting thing I found is that the stock knock-outs in the galvanized steel box cover fit the emergency stop panel mount diameter just perfectly.


Tuesday, September 14, 2010
New Project: CNC (anything)
John and I have been talking about building something new and fun- a 3 axis CNC mill. It's amazing where things have gone the last several years in affordable, easy to use electronics. There are literally thousands of examples on the web where people have built their own CNC machines for a very reasonable price. The neat thing about this project is that:
A) the project itself should be fun and a great learning experience
B) once built, it can be used to make all kinds of neat, high precision parts for other projects.
Personally, I think it'll be great for making custom wing cores and cutting out plywood components for aircraft.
The timing seems right, since I'm also just starting a project at work where I need to build a simple piece of test equipment which will provide me with practice directly appliable to the CNC mill.
Friday, August 20, 2010
Monday, August 16, 2010
Sunday evening ride
After we returned home from the weekend trip to my cousin's wedding, I put in a quick ride:
14.71 miles @ 17.8 mph average. The first 13.3 miles were @ 18.8 mph, then I did the last leg through the highway 101 construction zone which slowed things down considerably.
Only three weeks left until the big race. Time to crank things into high gear.
14.71 miles @ 17.8 mph average. The first 13.3 miles were @ 18.8 mph, then I did the last leg through the highway 101 construction zone which slowed things down considerably.
Only three weeks left until the big race. Time to crank things into high gear.
Monday, August 9, 2010
Wednesday, August 4, 2010
The best moments are never on video...
Last night my neighbor Kai Kroll was over, and we were flying the Supercub off the lake. After 3 batteries between the two of us, Anna came down and decided to try a flight. Well, she put the airplane into a dive that I couldn't quite pull out of- and it smacked into the water really hard, with the floats belly-flopping into the water. The float mounts broke, and while the floats stayed on the water the airplane bounced upward. By this time I had control back, and I firewalled the motor to keep the now floatless airplane out of the water. All I could think of was crap, how am I going to land this? I was thinking that I could slow it down and ditch it into the weeds and big rocks on the shore. After regaining a little altitude, I throttled back and banked it back towards the dock. As it neared, I lined it up with the long part of the dock and continued to throttle back. I realized that I had it lined up perfectly to fly parallel with the shore to fly it right down the dock in front of the bench between the dock posts. Kai and Anna dove out of the way, and I chopped the throttle and reached up and grabbed the cub as it flew overhead. Amazingly I actually caught it without chopping my hand to bits or damaging the plane. Kai and Anna (any myself) were shocked- neither one of them even realized that the floats were still in the middle of the lake.
One more reason why there should always be a camera going when flying...
One more reason why there should always be a camera going when flying...
Sunday, August 1, 2010
Last component of Backup Strategy
A month or two ago I added a DNS-321 network storage device. I moved all of our photos, documents, music, etc onto this device. Since this box has twin mirrored drives, there is some protection from physical drive failure. However, it doesn't have "previous versions" (which you'd have on a drive on your windows machine), plus if there is a fire, flood, theft etc I'd still lose my data. So, the final component is to add an off-site backup.
The most convenient and fail-safe method seems to be an online backup service. At work we use mozy.com, but mozy seems to be focused on business backup. One of my co-workers uses idrive, and had good things to say. So, today I signed up and started the backup process.
Essentially, for the initial backup it takes a long, long time to copy all of your data onto their secure servers. Once the initial backup is complete, each night it looks for new or changed files and only uploads the new files. Easy and relatively cheap, $4.95 per month for 150 Gb of storage.
Weekend's Rides
Saturday: dirt @Murphy: 30.1 miles 11.1 average.
Fantastic ride. The first lap was a little tough, I didn't feel put together and the singletrack wasn't flowing. After getting warmed up, the second and third laps felt great. By the end of the third I was getting tired. Mostly my arms. I'm planning on adding more core exercises and some basic arms for the gym workout for August. One weird effect of the longer mountain ride- I was craving and literally smelling Ho-Hos by the end of the 3rd lap. Is that normal?
Mmmm, Ho Hos!
Josh reminded me of the BBQ- I was planning on grilling after Thursday's ride at Leb but the possibility of burning some tasty brats after Saturday's ride slipped my mind. It was probably better I didn't bring it with, though, since I needed to help move stuff out of the duplex immediately after I returned home.
Sunday: pavement 24 miles 16.1 ave
Nice tool about town, first cruised over to the new Sport Hut off of Hwy 55 and 24. I initially didn't like their new location, but I'm warming to it. Even though their new digs don't seem as nice to me as their old place, their employees are friendly and seem to know what they are talking about. I had to pick up a couple road tubes before I really started my ride- I was clean out of tubes from all my flats lately. Next I headed over to the Wayzeta High School to check out suitability for flying. Wouldn't you know it, the Plymouth Elm Creek Playfields are hidden behind the school. There must be at least 10 soccer fields- and no light poles. Perfect flying location. I'll have to check it out. Then I looped west on Schmidt Lake Road to Old Rockford Road to Hamel Road. None of these have good shoulders, but there was interrupted sections of bike trail to hop between and traffic was light. Once on Hamel Road I was able to cruise west to 19, south through Baker Park, then back on 24.
Overall my legs felt surprisingly good. After yesterday's effort I thought they'd be dead tired. My average speed was lower than usual, but that may have been from riding around Plymouth and dealing with stop lights.
After the ride I tried a new recovery drink- chocolate malted Ovaltine in skim milk. I don't know if it's effective, but it tastes good and has tons of vitamins. It has to be better for you than my usual Nestle Quik.
Fantastic ride. The first lap was a little tough, I didn't feel put together and the singletrack wasn't flowing. After getting warmed up, the second and third laps felt great. By the end of the third I was getting tired. Mostly my arms. I'm planning on adding more core exercises and some basic arms for the gym workout for August. One weird effect of the longer mountain ride- I was craving and literally smelling Ho-Hos
Mmmm, Ho Hos!
Josh reminded me of the BBQ- I was planning on grilling after Thursday's ride at Leb but the possibility of burning some tasty brats after Saturday's ride slipped my mind. It was probably better I didn't bring it with, though, since I needed to help move stuff out of the duplex immediately after I returned home.
Sunday: pavement 24 miles 16.1 ave
Nice tool about town, first cruised over to the new Sport Hut off of Hwy 55 and 24. I initially didn't like their new location, but I'm warming to it. Even though their new digs don't seem as nice to me as their old place, their employees are friendly and seem to know what they are talking about. I had to pick up a couple road tubes before I really started my ride- I was clean out of tubes from all my flats lately. Next I headed over to the Wayzeta High School to check out suitability for flying. Wouldn't you know it, the Plymouth Elm Creek Playfields are hidden behind the school. There must be at least 10 soccer fields- and no light poles. Perfect flying location. I'll have to check it out. Then I looped west on Schmidt Lake Road to Old Rockford Road to Hamel Road. None of these have good shoulders, but there was interrupted sections of bike trail to hop between and traffic was light. Once on Hamel Road I was able to cruise west to 19, south through Baker Park, then back on 24.
Overall my legs felt surprisingly good. After yesterday's effort I thought they'd be dead tired. My average speed was lower than usual, but that may have been from riding around Plymouth and dealing with stop lights.
After the ride I tried a new recovery drink- chocolate malted Ovaltine
Wednesday, July 28, 2010
Sunday, July 25, 2010
Sunday's Ride Home
Back home. 1206.2 miles total
I had a nice flat just north of Green Bay, WI. Luckily Tom was behind me to pull up and let me know something was wrong with the bike. I was assuming the increased steering effort was from the grooved concrete pavement! I pulled over, and there was still some air in the rear tire. I put the hazards on, and crept at 10 mph on the shoulder to the next exit. Luckily it wasn't far, and there was a Shell station nearby. While the Shell station didn't have service, they did sell a simple plug style tubeless tire patch kit. The kit worked well. It only took a few minutes to install the plug. We waited for fifteen minutes or so for the tire and wheel to cool down and the glue to set. After testing the pressure again, we took off. I checked the tire pressure every time we stopped for the rest of the trip, and it seemed to hold the pressure well.
Plug installed, prior to trimming:

Hey, get that camera outa my face!

Saturday, July 24, 2010
Friday, July 23, 2010
Thursday, July 22, 2010
Sunday, July 18, 2010
26.4 miles 17.8 MPH average
New favorite road: Hamel Rd between Cty Hwy 19 and Hunter drive. Very nice, old fashioned farms, rolling hills, horses. Not much for a shoulder, but basically no traffic.
View Larger Map
New favorite road: Hamel Rd between Cty Hwy 19 and Hunter drive. Very nice, old fashioned farms, rolling hills, horses. Not much for a shoulder, but basically no traffic.
View Larger Map
Saturday ride w/ Anna
Sat. Ride w Anna: 32.5 miles 12.5 MPH average. Yet another massive flat, but only .5 miles from home, ran it in. It's tough to ride this slow. But, slow miles must be better than no miles. At least I felt very fresh when I got home, as in didn't feel like I rode at all.
This week I'll be out of town on business. I'm planning on bringing my running shoes with to hopefully get in a few good runs. I'm also planning on putting together a formal training plan to map out the last month before the Dakota 5-0.
I'm also really looking forward to this coming weekend's moto trip with Josh and Tom. It should be a great time- Michigan here we come!
Thursday, July 15, 2010
Mr. Yang's First Flight
Well, not exactly his first. But his first successful flights after some flight training....

Tuesday, July 13, 2010
Saturday, July 10, 2010
Wednesday, July 7, 2010
El Moto
Limited pix so far, but here are the juicy details:
I've put about 360 miles on it since last Tuesday. So far I am very happy with the bike. The brakes, handling, seating position, wind protection, and motor all seem great. I feel much more comfortable on this bike than my old VFR. The VFR was a great bike- but great for longer distance sport touring. Around town it was a bit of a handful and just felt clumsy. It felt like it wanted to flop into lower speed turns, particularly with a passenger. The FZ6 has effortless low speed handling and seems very flickable. The seating position is also very upright and comfortable.
The only low spot so far is the transmission. It's very smooth shifting for gears 2-6, but the 2 - 1 shift is very notchy, and finding neutral can be challening at times. However, the shifting has smoothed out a bit. I'm expecting it to further improve after the break-in service and fresh motor oil. I'm also very pleased with the motor. It's very, very smooth- no weird mid-RPM changes (ala VFR VTEC). Low end torque is nothing like a 1000cc V-twin, but it revs easily and power builds quickly. When accomidating for RPM it doesn't seem any slower than the VFR. The wind protection and suspension also aren't quite up to the VFR standards, but these are all minor quibbles.
All in all, I'm very happy with the purchase. I think I'll also end up riding this bike a lot more than my VFR, just because I feel more at home on the bike, and it's so much more fun zipping around town.
My next steps are to find some good soft saddlebags for it, and install heated grips and a 12v auxilary power jack. I have some T-rex frame sliders that I'll probably install tonight.
let's ride!

- 2009 Yamaha FZ6, brand new
- dark blue
- $5,199
All in all, I'm very happy with the purchase. I think I'll also end up riding this bike a lot more than my VFR, just because I feel more at home on the bike, and it's so much more fun zipping around town.

Thursday, July 1, 2010
Mt. Kato, revisited
Anna took some great shots at the race...

John and I discussing "strategy" before the race

Pursuing John across the ridgeline

Post Sport Race
John and I discussing "strategy" before the race
Pursuing John across the ridgeline
Post Sport Race
Monday, June 28, 2010
Mt. Kato Race Results
Photos to follow...
Sport Class Results:
5/8 age group
40/79 overall
I felt I gave a pretty good effort. I need to work on my warmups- again, after lap one I felt much better and was able to give it more gas. I also rode more conservatively then necessary in the wet and slippery stuff. Hopefully at least one race this summer will be dry. I'm curious to see if everyone speeds up the same amount, and my relative placement is the same, or if I speed up more than the average racer and place higher.
I had a fun time riding, and most everyone was friendly and also seemed to be having a good time- except for one Freewheel rider. Perhaps he was ultra-focused because everytime I passed him (or visa-versa) there was not a word back from my greetings.
The deep muddy puddles were refreshing to splash through.
Friday, June 25, 2010
Mt. Kato
Rain or not, I'll be racin' at Mt. Kato- I'm pre-registered so the money is spent. I didn't get in any great training rides this week, but I was running lots of errands on the commuter bike, including picking up some 44" long blinds at Lowes. FYI you can easily carry that on the bike by duct-taping it to your top tube. While it looks like you are carrying a missile, it is nice and secure.
Wednesday, June 23, 2010
Runnin'
4.1 miles last night, roughly 9 minute mile average. I left Sophie (the dog) at home because she would have fallen over and died from the heat after the first mile. This was my longest run yet. I felt pretty good, I think I could have easily completed a 10k. However, afterwards I could feel a little ache in the knees- running definitely pounds you more than riding. It was a fun route to run. Highway 101 is currently torn up between highway 6 and highway 24, so it was a bit like running a cross country course. Lots of dirt, large equipment, and holes in the ground to navigate.
View Larger Map
Hopefully the weather will hold out this afternoon for a road ride.
View Larger Map
Hopefully the weather will hold out this afternoon for a road ride.
Tuesday, June 22, 2010
Parkzone P-51BL back in action
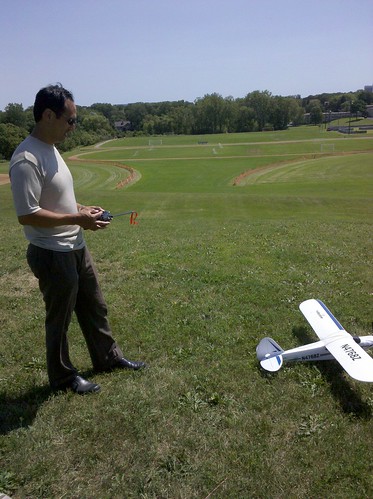
One of my co-workers, Alan, received a Hobbyzone Supercub for a father's day present, and I've been doing some training with him over lunch the past two days so he doesn't total it again. He tried flying it himself on Sunday, and it needed lots of glue and tape after that. Alan and I had some good flights today. It was a little breezy, but otherwise very nice flying. After letting him fly two batteries through my Supercub, it was time to break out the mustang.
The P-51 is now officially a monster. (or more of a monster) I replaced the wing servos with some Parkzone 1061 metal gear servos as one of the original ones stripped a gear. The new servos are larger and have slightly longer travel- wow, what a difference. I nearly augered it in before I became used to the faster roll rates, even at “low” rate. At high rate it’ll do at least two rolls per second. It also nicely snaps back to level flight upon releasing the sticks. Hopefully the metal gears will be more durable than the original plastic gears.
It is now powered by a Turnigy 35-36 1400kv motor, as the 35-36 1100kv I previously had mounted went up in smoke a few weeks ago. I'm not sure what the continuous current rating for this motor is, but it seems happy with fairly high current levels for short amounts of time.
Amp meter results:
I’ll have to try it with a 9x6 prop to see if I can get a little more speed for the same amp draw. Even with the 10x5 it’s fast, even at ¼ throttle. One problem is that it doesn’t have quite enough elevator throw, which made for some hairy dive pull-outs. I may replace the stock control horn with one that moves the connection closer to the elevator centerline for more travel.
I'm still very pleased with the Parkzone P-51BL. Very fast, stable flier, and fairly durable. It has handled lots of upgrades very well, especially considering these upgrades have upped the weight. It might be fun to build another up, but try to keep it as light as possible.
The P-51 is now officially a monster. (or more of a monster) I replaced the wing servos with some Parkzone 1061 metal gear servos as one of the original ones stripped a gear. The new servos are larger and have slightly longer travel- wow, what a difference. I nearly augered it in before I became used to the faster roll rates, even at “low” rate. At high rate it’ll do at least two rolls per second. It also nicely snaps back to level flight upon releasing the sticks. Hopefully the metal gears will be more durable than the original plastic gears.
It is now powered by a Turnigy 35-36 1400kv motor, as the 35-36 1100kv I previously had mounted went up in smoke a few weeks ago. I'm not sure what the continuous current rating for this motor is, but it seems happy with fairly high current levels for short amounts of time.
Amp meter results:
- 10x7 prop = 64A = 710 watts = 0.95 horsepower
- 10x5 prop = 57A = 632 watts = 0.84 horsepower
I’ll have to try it with a 9x6 prop to see if I can get a little more speed for the same amp draw. Even with the 10x5 it’s fast, even at ¼ throttle. One problem is that it doesn’t have quite enough elevator throw, which made for some hairy dive pull-outs. I may replace the stock control horn with one that moves the connection closer to the elevator centerline for more travel.
I'm still very pleased with the Parkzone P-51BL. Very fast, stable flier, and fairly durable. It has handled lots of upgrades very well, especially considering these upgrades have upped the weight. It might be fun to build another up, but try to keep it as light as possible.
Wednesday, June 16, 2010
LSD Road Ride
I took today off work, and after finishing chores around the house. Among other things this included replacing a hard drive in the DNS-321 unit which was A) very easy and B) the failed hard drive didn't cause any lost data or interruption of service.
Finally, after all this stuff that really didn't need to take up time on a day off, I set off on a road ride. I originally wanted to put in 50-60 miles, but since I wasn't able to leave until 2:30 or so, I was running into a later hard stop deadline. So, I played around with google maps until I found a slightly shorter route. It turned out to be about 41 miles, average speed 16.3. It was a beautiful day- sunny, warm, and with a slight breeze.
It wasn't a bad route- basically head west on the St. Boni trail, loop around the SW side of Lake Minnetonka, then head back on the LRT trail, then hook back up with McGinty road and the 494 trail to head back up north. However, the google bike route generator has some missing data- just FYI the County Road 11 between St. Boni and Victoria has basically zero shoulder. The bonus surprise was jumping on some trails again at the Lowry Nature Preserve NW of Victoria- very nice and scenic park from what I could see from the trail.
Unfortunately, just after I turned around at the farther point out near St. Boni, poof, the rear tire blew out. Very fast deflation, and it took a small chunk out of the tire. It looked like a staple or nail hole, but the offending party didn't stick around for me to see. I rarely get road flats, so this was actually the first time I had tried my birthday present from several years ago out- a nice looking Serfas carbon tube mini-pump. Once I figured out that I had to remove the little plastic component inside of the pump head for it to fit right on the presta valve stem, it worked fine. I was probably able to get it up to 80 PSI or so for the ride home, no more problems.
My legs felt pretty decent until when I turned north on McGinty road and the bike trail north of it- there are some big hills, and my quads were pretty much done. I'm going to have to crank up the road mile volume fast.
Goals: 2000 miles road & 500 miles dirt before the Dakota Five-O. I'm currently at 465 / 118 so I have a ways to go. There is 12 weeks left before the big race, so I'll have to average 128 road miles and 32 dirt miles every week. I think the road miles might be do able, but the dirt will be tough or impossible. A good goal, though.... In past years I've averaged about 1700 miles per year, so these goals are a significant increase.
View Larger Map
Tuesday, June 15, 2010
Road Ride - finally!
After slacking on the riding for what feels like months, I finally made time to get out on the roadie. I think this is my first ride to "ride" (other than riding to work) for a couple weeks. I did a nice loop around the west side, 20.6 miles, 16.8 mph average. Not blazing fast, but I was only planning on a nice, moderate paced warm up the legs again ride. It was a great night for riding, plus I tailed a gigantic wild turkey on the Baker Park trails for 25 yards or so. Those things can run!
View Larger Map
My legs felt pretty good. I could tell I hadn't been seriously pushing pedals in a while, but the running definitely helps. Where it really makes a difference is standing up and jamming up hills. No issues there at all.
The weather looks promising for tomorrow- I may take part or all of tomorrow off and put in a 50 or 60 mile LSD ride.
Monday, June 14, 2010
Running Shoes & Nike+
I'm now sporting a new pair of Nike Lunarglide+ shoes . My old pair of Asics was getting very soft, and I could tell the heel wasn't providing much in the way of rotational support. One very interesting observation is just moving the Nike+ sensor
  from my old shoes to the new ones resulted in slightly different (faster) speed & (farther) distance readings. I had the sensor taped in the tongue of the Asics because they didn't have a dedicated sensor pocket. I'm guessing the impact force readings are much different in the floppy shoe tongue versus the sole of the shoe. Or maybe the new shoes just make me faster!
I've been running 2 -3.5 miles perhaps three or four days a week now, mostly just to try and keep our dog somewhat tired out so she won't rip the house apart when I am at work. I've also been hitting the weights during lunch with the guys from work with a pretty intense program. I think this running and lifting will help my bike performance, but I don't think it's a total substitute for miles.
I'm starting to get a little concerned about the Dakota 5.0, I think I need to put together a honest to goodness training program to prepare.
More IT Schtuff
Over the weekend I purchased a DLink DNS-321 network attached storage device  and two 1 TB Seagate Barracuda
 drives. Microcenter had great deals on all three, $20 rebate on the DNS and 1/2 off on each of the drives.
Anna's parents were in town, so Alan and myself went to work running some ethernet cable in the house. I now have a nice "IT" closet set up on a shelf in the laundry room. The cable modem, wireless router, and DNS box are all tucked up out of the way. We ran cat 5e cable from there to the office, and to both the upstairs and downstairs family rooms for use by the Xbox. The cable will provide faster access to the DNS box from the office desktop. The Xbox 360 doesn't have wireless built in, so it needs hard wiring to access the internet. We use it often to watch TV / movies from Netflix- which is a fantastic service.
I started copying all my photos, music and video over from my desktop to the DNS, but I started getting some drive errors from the DNS. The DNS continued to copy files, but it notified me via a polite e-mail that the right hard drive failed. So, it looks like I'll be heading back over to Microcenter to replace that drive. It'll be interesting to see how the DNS accepts the new drive. In theory, it should automatically recover from the error with no data lost or hassle other than popping out the old drive and inserting the new one.
The DNS seems pretty cool. It shows up on your network connected computer as a network drive, and you can also log into it via a web page to look at error logs, run diagnostics, etc. You can also set it up to e-mail you when a drive has problems, overheats, gets full, etc.
Friday, June 11, 2010
NAS Backup / File Sharing?
On a totally different subject, I'm doing some research on how to best accomplish the following tasks on my home network:
After doing some research into options, it seems like a NAS box (network attached storage) is the way to go. Basically, the NAS plugs into your home wired network or wireless router and acts like a file server. The question is, which one to choose, and how not to spend a ton of money making it happen.
Critical features seem to be:
1) RAID 1. This is two drives mirroring each other, to provide redundancy if one drive fails. I don't want to accidentally lose all of my photos
2) some way to backup the NAS box easily. Currently I'm thinking that using a web backup service would be the best and most secure option. One of my co-workers recommends IDrive- $4.95 / month for up to 150 Gb of backup.
Most of the NAS boxes out there also have other useful capabilities:
Contenders:
1) D-Link DNS-321
Another contender. Spotty reviews, although mostly positive. I've had good luck with Dlink products and I think this would be a top choice.
There is also a $20 rebate on this at Microcenter right now.
1) Buffalo Linkstation Duo
This seems to fit the bill- although as with everything else there is a wide variety of reviews- both good and bad.
3) HornetTek Mobile LANdisk
Seems generic and I haven't found much in the way of reviews... At least Microcenter has a good return policy. This is distant third.
- Provide a central file location so I can store my photos, video, documents etc, access them from any of my PC's without having to leave one of the PCs on all the time to act as a file server
- Provide automatic backup of the PC's attached to the network
After doing some research into options, it seems like a NAS box (network attached storage) is the way to go. Basically, the NAS plugs into your home wired network or wireless router and acts like a file server. The question is, which one to choose, and how not to spend a ton of money making it happen.
Critical features seem to be:
1) RAID 1. This is two drives mirroring each other, to provide redundancy if one drive fails. I don't want to accidentally lose all of my photos
2) some way to backup the NAS box easily. Currently I'm thinking that using a web backup service would be the best and most secure option. One of my co-workers recommends IDrive- $4.95 / month for up to 150 Gb of backup.
Most of the NAS boxes out there also have other useful capabilities:
- iTunes streaming
- web access to data
- etc
Contenders:
1) D-Link DNS-321
Another contender. Spotty reviews, although mostly positive. I've had good luck with Dlink products and I think this would be a top choice.
There is also a $20 rebate on this at Microcenter right now.
1) Buffalo Linkstation Duo
This seems to fit the bill- although as with everything else there is a wide variety of reviews- both good and bad.
3) HornetTek Mobile LANdisk
Seems generic and I haven't found much in the way of reviews... At least Microcenter has a good return policy. This is distant third.
Speedwing Update
Last weekend I joined John for an afternoon of RC flight. Well, the Speedwing still isn't ready for prime time. I adjusted the thrust angle so it is parallel with the wing chord, so it no longer tries to bury itself in the dirt the second you throttle up. However, now when you throttle up it almost instantly rolls over and tries to fly inverted. I think I'll be taking John's lead and move the motor so the thrust axis is directly on the wing chord instead of above it.
Basically, as I've been making modifications the wing is getting closer and closer to the super easy to make and cheap folded blue foam wings, except that it has taken many, many hours of construction. At least it's still cheap!
Basically, as I've been making modifications the wing is getting closer and closer to the super easy to make and cheap folded blue foam wings, except that it has taken many, many hours of construction. At least it's still cheap!
Thursday, May 27, 2010
Morning Ride
I'm trying to move my schedule forward to start riding in the mornings. One of my neighbors has been bugging me to join him on road rides Tuesday and Thursday mornings at 5:30AM. I'm not there quite yet, but this morning I was able to get up a little earlier and get in a 13.4 mile, 17.8 mph average ride.
View Larger Map
This is a nice short route, very scenic with rolling hills. Highway 24 in particular is great, blowing grass fields, white picket fences and horses all make it feel like you are far out in the country.
I'd like to scout out a route slightly longer with more elevation. I know there are some good hills a little farther south west, closer to Lake Minnetonka.
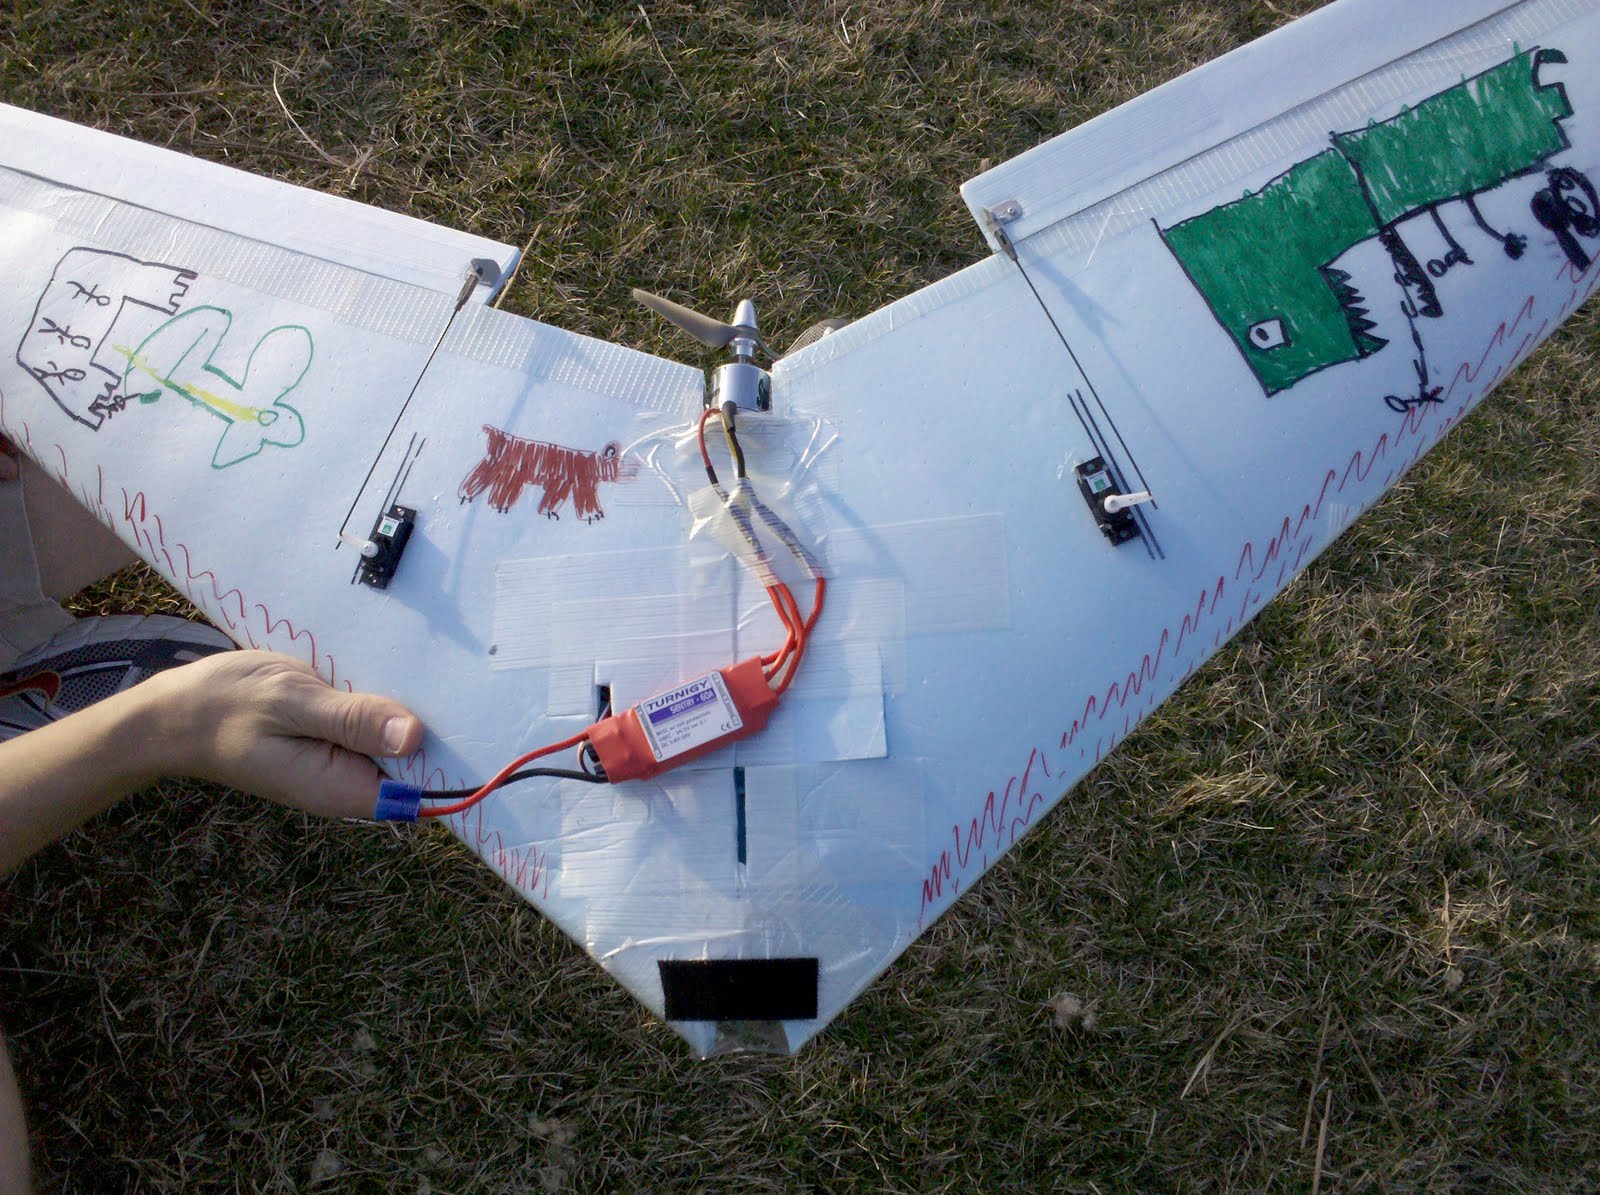
Speedwing Ready for Flight
When it was pouring rain on Tuesday night I finished up the speedwing. It turns out there were multiple cold solder joints in the motor to ESC connectors. I ended up re-soldering all of the motor connectors and a couple of the ESC connectors. It works like a dream now, no skipping or hesitations at any throttle setting.
I also added a velcro hold-down strap for the back of the canopy- I felt the magnets I had initially used didn't have enough hold-down strength. I don't want the canopy flying off at 150 mph and getting chopped into little pieces by the prop. I used two pieces of nylon tubing for pins at the front of the canopy - ala Parkzone's standard canopy hold-down system.
I'm excited to fly it for the first time, hopefully it'll fly well. With any luck it'll fly better than John's Super Stryker.

Tuesday, May 25, 2010
Parkzone Ultra-Micro P-51 first flight

Last Friday in a fit of impulse buying, I picked up a new Parkzone Ultra-Micro P-51. That isn't to say I haven't been thinking about buying one for a long time, but the timing was last minute. Due to weather conditions, racing, and house projects over the weekend I didn't have a chance to fly it until today. After the wind conditions calmed down to only breezy, added to a little peer pressure pushed me over the edge and I decided to do a quick flight off the parking lot out back of our office. Ryan volunteered to take video on my Droid, and here is the fun that resulted!
After a handful of very close calls, and realizing it was just too windy I tried to put it down. The landing was a little harsh, but only minor cosmetic damage resulted. Even with the challenge from the breeze, I can tell this will be a fun airplane to fly. (in calmer conditions!)
Sunday, May 23, 2010
Mudfest!
Saturday's first Minnesota State series race, Freewheel Frolic at Salem Hills, was the muddiest ride I've had in a long, long time. Probably not since racing back in 1997 or so, I think at Welsh Village, have I experienced such a mud fest.
I finished 10th in my age group, and 71st overall, out of a field of 162. (this was from the preliminary results posted at the race on Saturday) I wasn't very satisfied with my performance. The first two laps I really wasn't working too hard, and was really having a hard time with the conditions. Much of the course was clay mud with the consistency of crisco. It was a little like riding on semi-packed snow after lots of cars have rutted it up. Instead of just keeping my weight back, pedaling, and blasting through it, I was riding very conservatively. It wasn't until the third lap when I starting pouring on the gas a little more. I was feeling more comfortable with the mud, and in addition, the trail was drying out making everything easier.
All in all it was a great time, even after freezing my butt off before the race started, sitting in the rain waiting for the start time to be announced.
Hopefully I'll be more in tune with the trail next race!

Talk about a mess going back in the car!

Speedwing Nearly ready for flight...
I was finally able to spend a little tonight working on the speedwing. The control surfaces, motor, even stickers are installed and ready to go. Other than one problem I found tonight, I only need to put a couple pins in the front of the canopy to hold it in place, figure out how to stuff everything into the canopy for flight. The problem is the speed control, it seems as though there might be a bad solder joint on one of the connectors. It spins up sometimes but not others, and it seems as though if you rotate the connectors it'll affect the results.
Even so, some preliminary motor data:
Turnigy 3200kv 28-36
3 cell, 2200 mAh, 25C battery
4.1 x 4.1 APC prop = 30 amps
4.75 x 4.75 APC prop = 40 amps (plus lots of noise!)
I think I'm going to try a 6 x 4 prop as well. I have an 80 amp speed control and I figure I might as well make use of it. Otherwise I may order another 40 amp to try and drop some weight. The extra space would be helpful, as there is hardly any room for batteries & the associated wires. This thing should rip- the wingspan is only 25 inches, and with 40 to 80 amps driving the prop it should have plenty of go-power. I think I'll probably have to experiment with the thrust angle and center of gravity a bit to get it to fly well. Hopefully it'll be controllable the first time up.
As you can see, I went with a classic 1930's US army airforce color scheme. It should be easy to see in the sky. The bottom is navy blue.


Tuesday, May 4, 2010
Supercub w Floats
The supercub and floats I picked up a few weeks ago was a great purchase. I have ten flights so far off water and it flies beautifully. Not as much power or speed as I'm used to, but fun even so. I've been working on precision and accuracy which should help me out on my other models.
On a side note the mobile blogger tool seems to be screwed up- it was posting garbled text to my blog.
On a side note the mobile blogger tool seems to be screwed up- it was posting garbled text to my blog.
Tuesday, April 27, 2010
Hobbyzone Super Cub - With Floats
I picked up a Super Cub this past weekend instead of an ultra-micro. I immediately installed floats and performed the battery box modification so I could fit my larger 1800 - 2200 mAh LIPOs. I have a Turnigy 35-36c 1100kV motor earmarked for this plane to amp up the power to match Johny K's Super Duper Cub, but I thought I'd at least fly it a few times with a stock power system just to get a feel for it.
Unfortunately it was fairly windy all weekend, so I didn't get a chance to fly it until last night. Wind conditions were not bad in the protected bay I was flying from, but as soon as the airplane crossed an invisible barrier it would hit the winds blowing across the length of the lake, then it was buffeted around like a ping pong ball in a hot air popper. No video of the maiden flights. I put three batteries through it- not bad for first water take-offs and landings on a new airplane.
Observations:
- The stock power system is plenty for getting it off the water and just flying around. Not great for any kind of acrobatics, though- at least with the added weights of the floats. I managed to do a massive tail slide right into the lake because of a nice stall during a loop with insufficient airspeed.
- The Super Cub is pretty durable. In addition to the big tail slide into the drink, I also snagged a wingtip a couple times and cartwheeled into the water during low level turns when moving from the calm air to the turbulent air. No damage other than snapping the floats back in place. I just paddled the canoe out and grabbed the airplane.
- It's very confusing to fly a three channel airplane again after getting used to four channel flight. I kept on trying to turn the plane using the left stick when in the pattern or on the ground to no affect. I may have to convert the SuperCub to four channel flight just because of this.
Monday, April 26, 2010
Monday, April 19, 2010
Tuesday, April 13, 2010
John's 36" Wing
John built a 36" wing using the blu-core fan fold foam. He oriented the natural folds in the raw foam along the leading edge of the wing to produce a very nice looking airfoil. His original configuration had the motor on the leading edge of the wing. The CG was too far forward, and the flight attempts ended in nose-dives and broken props. Then, he took the utility knife and packing tape to the wing, converted it into a pusher and had better luck.


John reinforcing "motor mount" with packing tape
Reconfigured into Pusher Configuration
Thursday, April 8, 2010
Nearly ready for finishing
Last night I finished cutting out the battery compartment, added the socket for the receiver, and cut out the servo wire channels in the wing. Next step, final finishing and control surface installation. I'm weighing the options for finishing- full polyurethane glass, epoxy glass, or just reinforcement tape and paint or heatshrink covering?
Monday, April 5, 2010
More progress on the speedwing
Tonight I spend a lot of time dremeling out servo pockets, battery fuse cavities, etc. Mmm boy does blue foam dust taste good! I had to create a new fuselage canopy, as the original was too short to allow the 4s batteries to fit. I put in a quite long battery location, so I should be able to accommodate just about every 3s and 4s battery I've got. The 3200 kv motor is up and running as well. This thing should be a monster. Hopefully it'll fly better than John's super-stryker. The blue foam isn't as forgiving as Parkzone's Z-foam, so this might only be good for one hard impact.

The canopy will be hinged or pinned in the front, and attached in the rear via powerful magnets, ala Parkzone's standard procedure.

I'm still not sure where the receiver will go. I might mount it in the top of the canopy, or else carve a pocket for it inside the nosecone. This may post a risk, during a hard crash it could get creamed by the battery.
I think the power wires will run over the top of the battery back to the ESC. I'll probably velcro down the ESC. I'm planning on running fiberglass cloth all the way across the bottom of the wing, and probably over the top except for the battery pocket.

Saturday, April 3, 2010
John Forfeits Speed Contest!
Tonight John Forfeited the speed contest by crashing out.
Before the first flight attempt:

For the first flight attempt, John was going to give the plane a good toss, then throttle up the motor- since you hold the aircraft on the bottom, you've got to be careful not to slice up your hand/arm with the prop when you toss it.
For the second attempt, John planned on throttling up the motor, then giving it a good sidearm toss. This technique has worked well for me with my speedwing prototype #1 plus my microwing.
This try didn't end well- the nosecone broke off and one of the control surfaces was pulled from the wing.

Total bummer. Hopefully when I have my speedwing contest entry put together the first flights will end better!
Before the first flight attempt:

Very impressive. Looks fast. John looks happy. This happy expression won't last long!
For the second attempt, John planned on throttling up the motor, then giving it a good sidearm toss. This technique has worked well for me with my speedwing prototype #1 plus my microwing.
This try didn't end well- the nosecone broke off and one of the control surfaces was pulled from the wing.

Total bummer. Hopefully when I have my speedwing contest entry put together the first flights will end better!
Friday, April 2, 2010
Turnigy 2826 - 3200kV + Stryker Mount
FYI a Turnigy 2836-3200kV motor fits perfectly in a bone stock Stryker motor mount. The only modifications required are a slight enlargement of two of the motor mount screw holes, easily accomplished with a dremel tool and two seconds.


Monday, March 29, 2010
Final Flight of John's T-28
I also captured a short short of John getting the T-28 into final pattern and landing, shortly before it's final, ill-fated flight.
Aftermath of Johnny K's T-28 Crash
I won't say much, because I'm sure John will elaborate, but 100+ MPH speeds and batteries weighing 4-5x what the stock batteries weight eventually caused his T-28's wing to fold. The aircraft did a very nice axial roll into the ground at full throttle and a high rate of speed. The results are shown below. Nothing was moved in the photos after the crash.

 The photo doesn't quite do the crash justice, there was a literal cloud of debris after impact!


 5s 3000mAh LIPO battery- slightly shorter than stock!
 John demonstrating the folded wing.
 Dented LIPO battery after the exterior covering was removed. Amazingly, the battery did not rupture or catch fire.


Subscribe to:
Posts (Atom)