I'm still not flying through the FPV downlink, but practice makes perfect....
Flight #1
Don't worry- the only damage was a broken prop and re-breaking one of the landing gear legs
Flight #2
A little smoother... The 5.8 Ghz transmitter doesn't do too bad, even when trying to push a signal all the way through the house. I'll do a longer range test one of these days in an open field after I have the wide angle lens and some more quad flight confidence under my belt.

Friday, November 30, 2012
Tuesday, November 20, 2012
Initial Q450 Quad flight while recording FPV video
I received the replacement component video recorder yesterday, and was able to get the video input/output cableing sorted out. One thing I quickly learned was that 4 pole 3.5mm plugs (looks like headphone plugs but with one additional pole) do not have a standard pin-out. I'm going to have to manually take apart the cables and re-wire several of the poles to permanently fix my cable setup, but until then I'm just inserting the plugs partially into the sockets on the recorder. It's very hack but it's working.
The initial flight was a line of site (LOS) flight indoors. Moral of the story- don't be messing with your auto-level settings while at the same time trying to pilot a quad around near the ceiling.
The crash looked bad, but the only damage was one broken landing gear leg. A little CA + UV cure glue and it's good as new. Maybe better, as now it has a nice fillet at the joint.
Tuesday, November 13, 2012
5VDC Power Supply for video recorder
The upcoming video recorder needs 5V DC. Since I want the ground station to run off of one 11.1V battery, some sort of DC to DC power supply is needed. I didn't want to do anything fancy- so I did some web searches and decided to go with a simple 7805 voltage regulator circuit. It isn't particularly efficient, but it's simple, cheap, and I had the parts available.
 |
| Basic circuit diagram (7805 is center component) |
 |
| Circuit Breadboarded. I added a LED (with current limiting resistor) to show on/off status |
 |
| Circuit moved to permanent breadboard |
 |
| Soldered Breadboard (extra length of leads were trimmed after testing) |
 |
| Finished, with heatsink on 7805 |
Saturday, November 10, 2012
9:zero:7 First Ride!
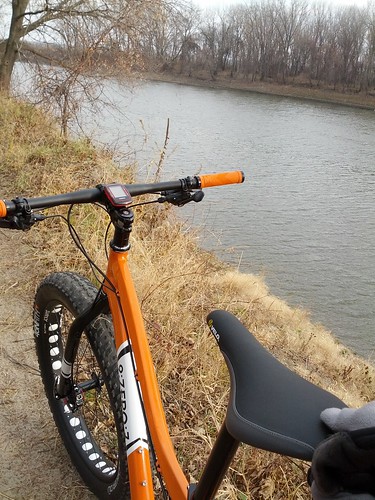
After much deliberation, I picked up a new mountain bike last week- a 9:zero:7 fatbike.
I took Friday afternoon off to get in some dirt rides before the snow flies. I decided to hit some trails I'd probably be riding after we see some snow- the Minnesota River Bottoms and Lake Rebecca Park Reserve. The River Bottoms were a blast from the past- I haven't been down there in over 10 years. It was surprisingly warm- I ended up riding in shorts and a long sleeve jersey.
The new bike was great- handled really well, unlimited cornering traction, and a nice smooth ride. It also was great on the loose sandy sections- just floated right over them and tracked straight and true. Overall I'm very happy with it so far. I hope to have lots of great adventures with this bike. I still have to get the ergos dialed in. I'm going to exchange the post for a setback Thomson- I currently have the seat jammed as far back as it can go. They Thomson's 440mm length will also help- the stock seatpost is 1/4" over the maximum extension markings.
Lake Rebecca was surprisingly not bad. I've never ridden there just because I've never heard anything good about it. While it is totally non-technical, there is lots of climbing. If anything it reminded me of Lebanon Hills before MORC came in- lots of steep up and downs, straight up and down the side of the hills. There is lots of space and vertical relief at Lake Rebecca, so if Three Rivers Park District ever decides to improve the riding there, they could really put in a sweet trail.
Tuesday, November 6, 2012
FPV Goes Live
"First Light" today on the Q450 quadcopter! I don't have any video available yet because I don't yet have the video recorder. The final steps left before I could fire it up for the first time was simply to mount the camera and video TX on the quad.
Camera Mount
After using a plastic electrical box cover to make the KK2.0 Flight Controller mount, I thought I could find something in the Menards electrical aisle that would work well for a camera mount. Low and behold, a low voltage box looked like it would work great. One low voltage box will make two camera mounts- maybe one FPV camera and one GoPro?


Flight!
So, the big question- how does it work? No video or photos yet... The video quality looks pretty good, but when the motors throttle up there is a fair amount of vibration visible. I'll have to use thicker / softer grommets to isolate the camera better. The camera body might also be touching the orange plastic of the mount- I'll have to grind some material off of the mount to eliminate any possible contact. Other than that, looks great. It was already dark outside so I wasn't able to try any test flights of any distance.
Changing out the old Canon point-and-shoot for the FPV camera and Video TX didn't seem to affect the balance of the quad- no trim adjustments necessary. Adding a GoPro or similar might change the CG more.
I did adjust the camera mount slightly down so it wasn't looking through the rotors. It was very easy to do- just use a small torch to carefully heat the bottom edge of the camera mount, and when the plastic starts getting soft just bend to the desired angle. Not bad for a very cheap DIY FPV camera mount.
Camera Mount
After using a plastic electrical box cover to make the KK2.0 Flight Controller mount, I thought I could find something in the Menards electrical aisle that would work well for a camera mount. Low and behold, a low voltage box looked like it would work great. One low voltage box will make two camera mounts- maybe one FPV camera and one GoPro?
 |
| Low voltage box with the trim lines marked |
 |
| Test Fitting the camera |
 |
| Test fitting camera after trimming box |
 |
| Camera Mounted- 2-56 x 1/2" machine screws, lock nuts, and rubber grommets between camera and mount. Hopefully the grommets will act like enough of a shock mount to prevent vibration from shaking camera too much. |
 |
| Note slot cut in base using dremmel cut-off wheel |
 |
| Bolted to Hobbyking Q450 quadcopter frame |

 |
| Video Transmitter (TX) mounted to the "roll cage" using velcro tape and a zip tie |

Flight!
So, the big question- how does it work? No video or photos yet... The video quality looks pretty good, but when the motors throttle up there is a fair amount of vibration visible. I'll have to use thicker / softer grommets to isolate the camera better. The camera body might also be touching the orange plastic of the mount- I'll have to grind some material off of the mount to eliminate any possible contact. Other than that, looks great. It was already dark outside so I wasn't able to try any test flights of any distance.
Changing out the old Canon point-and-shoot for the FPV camera and Video TX didn't seem to affect the balance of the quad- no trim adjustments necessary. Adding a GoPro or similar might change the CG more.
I did adjust the camera mount slightly down so it wasn't looking through the rotors. It was very easy to do- just use a small torch to carefully heat the bottom edge of the camera mount, and when the plastic starts getting soft just bend to the desired angle. Not bad for a very cheap DIY FPV camera mount.
Monday, November 5, 2012
FPV- A couple steps closer
So far it seems like getting an FPV quad up in the air consists mostly of soldering a lot of cables together.
Ground Station Progress
I was able to find a great deal on a portable DVD player on Craigslist. This seems to be a great option for a ground station monitor- just make sure it has a video input. The Magnavox I found for $20 has both video input, built-in batteries, and runs off of 9V DC. I removed the battery which dropped the current consumption considerably. Also, so far, it seems like it runs just fine off of a 11.1v 3s LIPO battery. The only annoying thing is that each time you turn on the DVD player, you must manually switch it to video in. Perhaps some surgery on the unit will fix that.....
Another note is that the video RX and DVD player both use 3.5mm 4-pole cables- which are very, very hard to find anywhere locally. These cables look just like headphone cables, but with an additional pole. MCM Electronics has a bunch of very reasonably priced cable options.
I have a composite video to SD card video recorder on order, also from MCM. This will be very nice for post flight (crash) analysis.
Quad-Copter FPV Progress
Connecting the camera to the video TX couldn't be easier. Connect the camera power leads (red and black) to the power output on the video TX- red and black part of the large group of multi-color wires. Then connect the composite video leads- yellow on the video TX cable bundle, and white on the camera's cable. That's all there is to it. The camera now has power, and the video TX now has a signal. I used some male and female break-away headers from another project to make home-made plugs.
I'm still trying to get Hobbyking to send me the OSD module that was missing from OSD package. Whenever that shows up (hopefully this year!) it'll also get wired in to the composite video lead. The OSD will provide some very valuable data- namely flight pack voltage and a return to home vector. Both of these pieces of information will be overlaid on the video that is broadcast to the ground station. Until that is in place I'll have to depend on the low voltage alarm that is currently mounted on the quad.
Next step, provide power for the video TX. Since this is going to be a very basic FPV setup with limited range and capabilities, I chose to save cost and weight and powered the video system from the main flight battery. A more robust route would be to use an additional battery pack. This particular camera and video TX like 12v DC, so the 11.1v 3s flight pack works just fine.
Next steps- build a camera mount. Ideally it'll accommodate the low-resolution FPV camera as well as a second HD camera, eventually a GoPro or similar.
Ground Station Progress
 |
| Cut Video RX power cable in half, then added an EC3 connector |
 |
| DC Power plugs for the portable DVD player |
Another note is that the video RX and DVD player both use 3.5mm 4-pole cables- which are very, very hard to find anywhere locally. These cables look just like headphone cables, but with an additional pole. MCM Electronics has a bunch of very reasonably priced cable options.
I have a composite video to SD card video recorder on order, also from MCM. This will be very nice for post flight (crash) analysis.
 |
Composite Video to SD Card Converter with AudioMCM Part #: 58-16090 | Vupoint Solutions Part #: DVC-ST100-VP-BX2 |
 |
| Magnavox portable DVD player (from Craigslist, $20) connected to Video RX (upper center) and power panel (left). See the live video feed on the monitor! |
 | |||||
| Back of power panel. Fuse- to prevent big problems in case of a short. Lighted power switch, and two barrier strips. Below are the power leads for the DVD player and the video RX. There is room on the panel to also add power leads for the upcoming video recorder. |
 |
| Nice bonus- Video RX + DVD player on only pulls 0.8 amps. (with DVD battery removed) It'll run for plenty of time on standard size 3s LIPOs. |
 |
| Where to mount the ground station? How about this sweet (and cheap) soft sided suitcase from IKEA! |
 |
| A couple rivets and velcro should do nicely to hold all the ground station components in place. |
Quad-Copter FPV Progress
 |
| Camera with wiring harness, before modifications |
 | ||||
| Video TX, before modification. |
 |
| Home-Made connectors using "break away headers" - these were secured together using electrical tape once installed on the aircraft |
Next step, provide power for the video TX. Since this is going to be a very basic FPV setup with limited range and capabilities, I chose to save cost and weight and powered the video system from the main flight battery. A more robust route would be to use an additional battery pack. This particular camera and video TX like 12v DC, so the 11.1v 3s flight pack works just fine.
 |
| Added additional JST connector to Quad power distribution board to power the camera and video TX |
 |
| Camera and Video TX, powered up by the Quad's onboard power |
Subscribe to:
Posts (Atom)