
Be warned that any dealing with LIPO batteries is potentially risky. Try this at your own risk!
Proposed solution:
- 2s or 3s LIPO batteries- normally used for drone or RC airplanes. Great power source but a bit risky to use since they do not have any built-in over discharge protection.
- MOSFET to handle power distribution
- Arduino Nano- I thought it would be possible to use the Nano to control the system and safely run the pump off of the LIPO using the following strategy:
- using a voltage divider, read the battery voltage and determine if it was a 2s or 3s battery (assuming the use of a LIPO pack)
- determine if the battery is in a safe operating voltage, and if not, shut the system down
- PWM the output to simulate a 6V power source for the motor
It's not well tested, and the code is messy, but it seems to work fine. I ended up not using the indicator lights as listed in the schematic and code. They really were not necessary, and they also seemed to make the circuit not work- perhaps I didn't have the pull down resistor sized properly on the MOSFET gate?
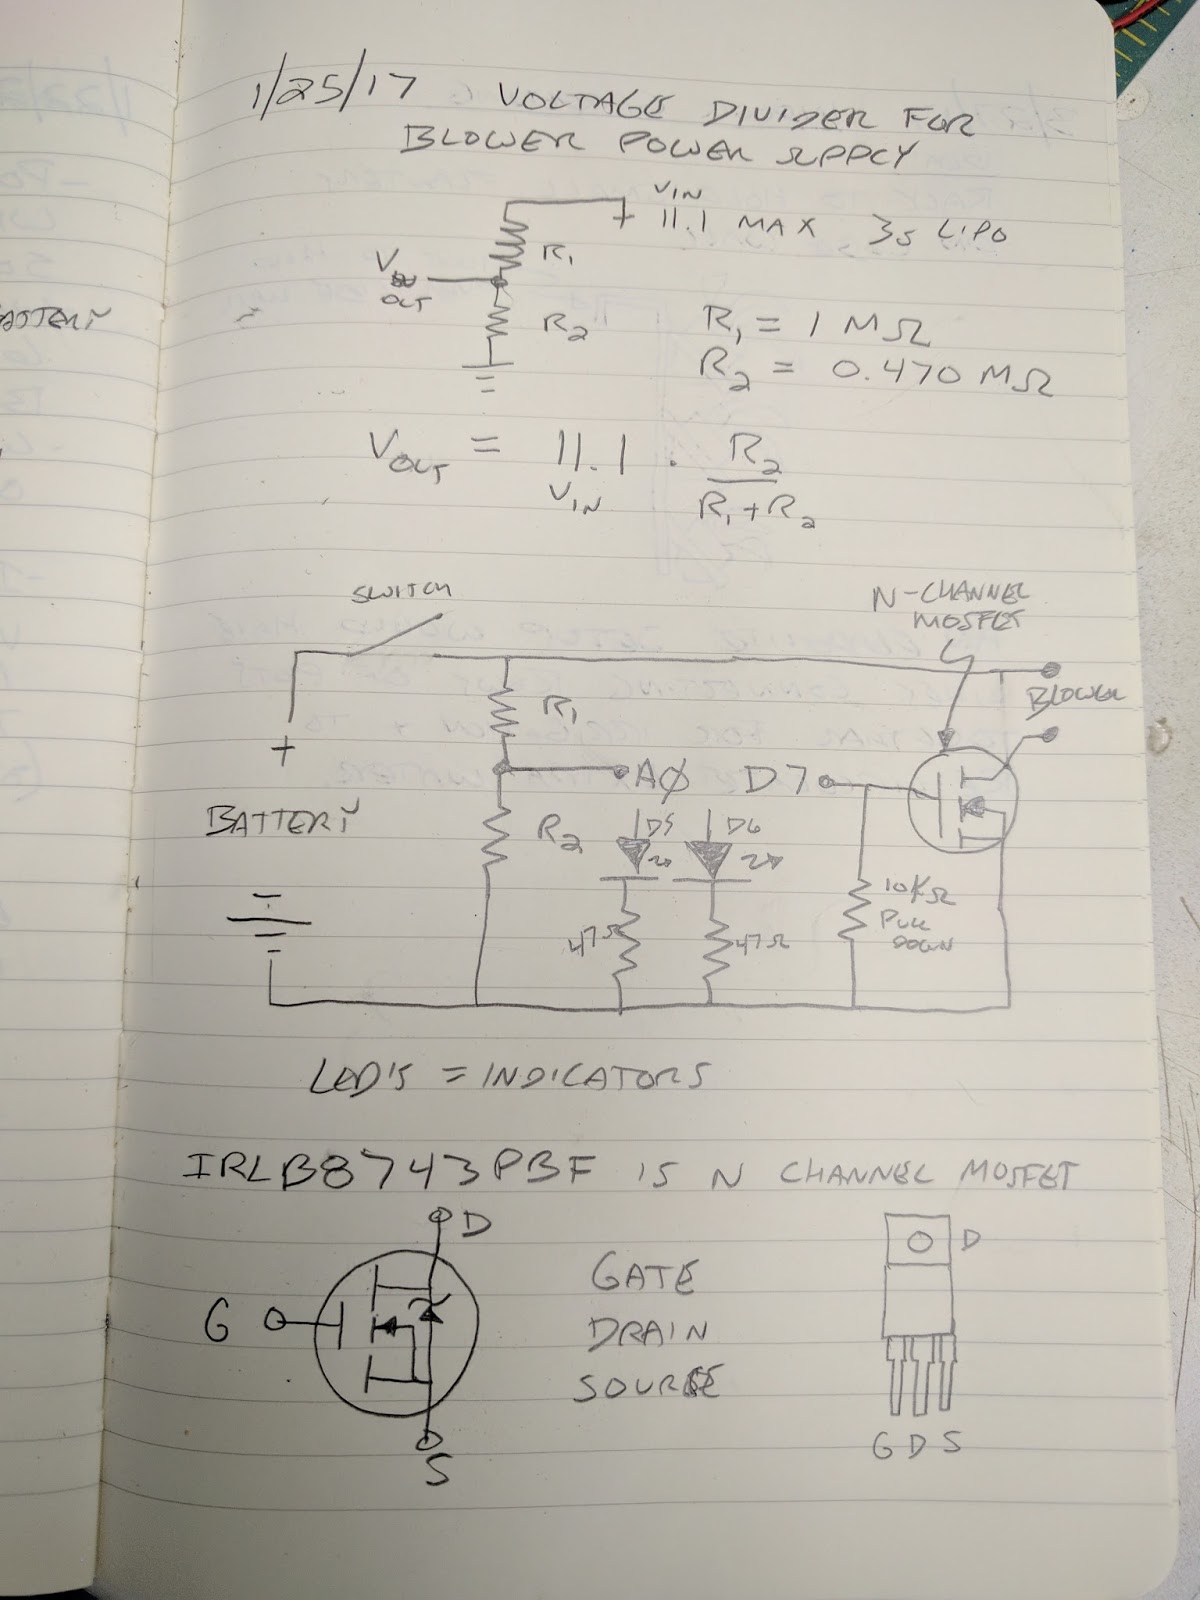 |
| Schematic with calculation for voltage divider |
There is a specific MOSFET listed, but any MOSFET that is N channel and can handle sufficient current should work.
I tested the circuit out on a breadboard first. After that seemed to work I soldered it on to a cheap 4x6cm protoboard and installed it in the pump shell. It was a bit of a tight fit on the protoboard.
 |
| Circuit installed in pump shell |
 |
| Circuit detail |
 |
| ready to rumble! |

Ugly code- note there is a collection of serial print hooks to track what is going on with the code / circuit:
/*
This software allows a 3s or 2s LIPO to power a 6V air mattress inflator
reads input voltage through voltage divider
determines if 2s or 3s battery is attached
if battery is in acceptable voltage range, allows pump to run and turns green LED on
if battery is too low, does not allow pump to run and turns red LED on
utilizes analog output (PWM) to simulate desired output voltage using MOSFET to control higher voltage and current from LIPO battery
*/
void setup() {
// initialize serial communications at 9600 bps:
Serial.begin(9600);
}
void loop() {
// constants
int analogInPin = 0; // Analog input pin that the potentiometer is attached to
int GreenLEDPin = 5; // digital output pin that the green LED is attached to
int RedLEDPin=6; // digital output pin that the red LED is attached to
int MOSFETPin=3; //output pin for MOSFET, must be PWM capable pin
float R1=100; //R1 value of voltage divider (divided by 1000)
float R2=48; //R2 value of voltage divider (divided by 1000)
int Lipocell=0; // default lipo cell count
float mincellV=3.0; //standard low lipo cell voltage
float cell_cutoffV=3.2; // cutoff voltage
float maxcellV=4.2; //standard high lipo cell voltage
float batteryV=0; //battery voltage
float sensorValue=0;
float inputVoltage=0;
int outputV=6; //voltage desired for output
float outputValue; //value for analog output
//pinMode(MOSFETPin, OUTPUT); //set MOSFETPin as output
// read the analog in value:
sensorValue = analogRead(analogInPin);
inputVoltage=sensorValue * 0.0049; // 5 volts / 1024 resolution = 0.0049
batteryV=inputVoltage * (R1+R2) / R2 ;
// determine if battery is 2 cell or 3 cell battery or if no battery is connected
if(batteryV >= (mincellV*2) && batteryV <= (maxcellV*2)) Lipocell=2; //set cell count to 2
if(batteryV >= (mincellV*3) && batteryV <= (maxcellV*3)) Lipocell=3; //set cell count to 3
if(batteryV < (mincellV*2) ) Lipocell=0; //set cell count to 0 (no battery)
outputValue = map(outputV, 0, batteryV, 0, 255); // map desired output voltage to PWM & output
// determine if the battery voltage is within acceptable range and battery is present & act accordingly
if(batteryV > (Lipocell * cell_cutoffV) && Lipocell != 0)
{
analogWrite(MOSFETPin, outputValue); //start MOSFET using PWM value
Serial.println("turning on output pin");
digitalWrite(GreenLEDPin, HIGH); //green light on
digitalWrite(RedLEDPin, LOW); //red light off
}
else
{
analogWrite(MOSFETPin, 0); // if battery too low set output to zero
Serial.println("turning off output pin");
digitalWrite(GreenLEDPin, LOW); //green light off
digitalWrite(RedLEDPin, HIGH); //red light on
}
// print the results to the serial monitor:
Serial.print("input voltage = ");
Serial.println(inputVoltage);
Serial.print("battery voltage = ");
Serial.println(batteryV);
Serial.print("LIPO cell count = ");
Serial.println(Lipocell);
Serial.print("output value=");
Serial.println(outputValue);
Serial.println(); //blank line for clarity
// wait XX milliseconds before the next loop
delay(1000);
}