Sunday, July 3, 2011

Surly Big Dummy mini-Review

Last week I sold my cyclocross bike / commuter and bought a 2011 Surly Big Dummy. Crazy, I know, but I thought it would be sweet to have a bike that would allow no excuses not to run all possible errands on the bike. Considering the Big Dummy has a listed cargo weight limit of 200 pounds, even picking up four bags of water softener salt is a doable errand.

Surly Big Dummy

So far I've only ridden it home from work and one trip about town and back home from the grocery store. The photo above shows it fully loaded with the items below. During this last trip I carried:
  • 21 pound bag of cat litter
  • 2x 12-packs of coke
  • bag of misc. groceries and cleaning supplies.
Not bad for a first trip. This bike handles surprisingly well even with a fair amount of weight. On the way back we detoured through some rougher bike trails and it did well. I'd consider even trying to ride Theo on it, although popping the front wheel over obstacles would be challenging to say the least!

My only negative so far is that when in the granny gear the two mile long chain drags across one of the frame members. I'll have to get some clear protective tape or old tire sections to protect the steel.

Another bonus is it may be possible to run snow bike tires and rims on this beast- with the super long wheelbase I bet it'd be very stable on rutted-out snowy trails.

Monday, June 20, 2011

Father's Day Flying

John and I were able to get out on some fun and destructive flying last night. Key flights include the maiden of my Balsa Baby Shark ( and promptly put it back in the shop ), and John's encounter with the Vortex of Doom with his E-Flite T-34.


Balsa Baby Shark


Looking at the video, I didn't have a very good launch. I did a weak toss better suited for an overpowered beast like my PZ P-51. I didn't dare launch the Babyshark at full throttle- so it was no more than 1/3 throttle during the entire short flight. I think it needs a hard, flat hand launch. Next time I'll also try it during a time when half the pattern isn't into the sun either. Luckily the damage was minor- broken prop, and the forward bulkhead was crushed by the battery. Both easy fixes. 

T-34 Aftermath

John's T-34 might not be quite as easy to fix....

But, I did manage to get the best flight out of my Tricopter yet.


The electronics seem to be pretty well sorted out. The tail rotor yaw mechanism isn't as robust as I'd like, and I also need some better visual markers to tell which way is "front".

Monday, June 13, 2011

Tricopter DX6i, AR6110 final setup

After lots of experimentation, I finalized my tricopter setup. I was origionally working from the setup guide on RCexplorer.se's website. His setup was for Futaba radio systems, and since I am using a Spektrum DX6i and a Spektrum AR6110 receiver my setup turned out to the slightly different.

These settings seem to work fairly well- it's obvious the limitations now are my piloting skills. I really need to attach a body or something so it's easy to tell which end is "front"- it is very easy to lose directional orientation!

NOTE THESE ARE DIFFERENT SETTINGS THAN MY EARLIER BLOG POST!!! I kept the original blog post active for reference only

AR6110 Receiver Connections:
(note gyros are in-line with connections between receiver and ESC or servos)

Channel Receiver Label Servo / ESC
1 Throttle Tail rotor gyro gain
2 Aileron Left rotor ESC
3 Elevator Tail rotor ESC
4 Rudder Tail rotor servo
5 Gear rotor gyro gain (split 3 ways)
6 Aux Right rotor ESC

The tail rotor gain is attached to the Throttle channel. If you had a 7 or more channel radio, you could attach this gain to another auxiliary channel with a seperate switch. Since I only have a DX6i I don't have this luxury. Since the radio is in helicopter mode, you can set your gain using your throttle curve. It's a pain to adjust your gain, but it works. To change your gain you have to adjust the throttle curve across all points- meaning each time you have to change the gain you change each of five location on the throttle curve to the gain setting you want.


DX6i Setup after several somewhat successful flights
(I need to work on my multi-rotor heli skills!)


Adjust List

Throttle Curve (tail servo gyro gain) = 95% (heading hold mode) at all points
intent: if gain is 0-50%, gyro is in rate mode. if it is 50-100%, it is in heading hold mode. The intent here is for the tail servo (yaw) gyro to be in heading hold mode. As far as I understand, lower numbers = higher gyro gain. This setting seems to produce a pretty rock solid heading hold, perhaps a bit of over correction.

Gyro: (gain for the 3 ESC gyros) = 35%. Seems to be fairly stable without too much overcorrection for my setup. Again, keep it under 50% so it is in rate mode, and lower numbers equals more gyro gain. Since the radio is in helicopter mode, the gyro adjust changes the "gear" output on the receiver.

Pitch Curve (normal)
Position Setting
L 0%
2 40%
3 50%
4 70%
H 100%


Dual Rate & Expo
Function Mix
Aileron 80%+20%
Elevator 70%+20%
Rudder 94%+inh

Swash Mix
Function Mix
Aileron +40%
Elevator -40%
Pitch +100%

Setup List

Reverse
Function Reverse?
Throttle N
Elevator N
Gyro N
Aileron R
Rudder R
Pitch R

Swash Type
CCPM 120 degrees

Why isn't balsa more popular?

Since Anna's been going to bed early every night because she is working hard growing a baby, I've had time to work on a number of different projects. I think people avoid balsa kits because of the time required for assembly- especially compared to quality balsa or foam ARF models - but I think there is a lot of satisfaction in actually building something. I also seem to have more time available at night at home vs. time available to actually go flying. For a beginner, though, nothing beats a foam ARF which you can repair in ten minutes with hot glue and packing tape. Balsa is a lot less forgiving.

Nanoplanes.net Balsa Baby Shark

Nanoplanes Balsa baby Shark just about completed

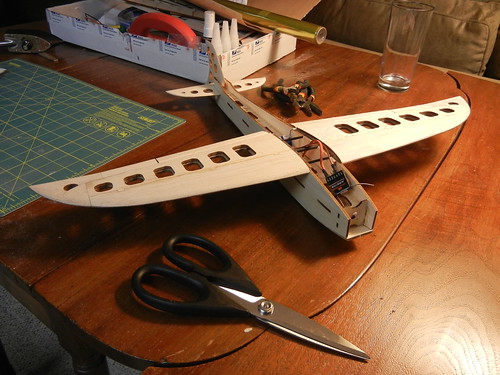
This is a first class product. (and I haven't even flown it yet) Top quality instructions, clever design and easy construction. In particular I really liked how they have you laminate different pieces of wood together with alternating grain direction for maximum strength. This should be an absolute rocket, I'm hoping for 100+ mph top speeds. I won't maiden this until I can have John help me trim it out at a large field.

In static testing the motor pulled 26.5 amps with a APC 4.75 x 4.75 prop.

Components Used:


Mountain Models Mini-Flash

Mountain Models Mini-Flash

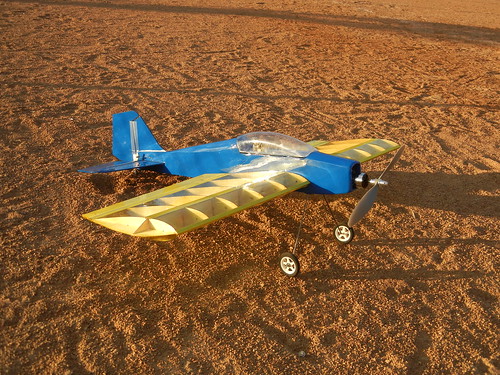
This was a fun build. All precision laser-cut balsa, the kit included a very complete hardware package.

It went together fairly quickly. The directions were not quite as good as the Baby Shark, and it would have been helpful to have alternative motor mounts available. The plane was designed for a GWS gear drive system with a stick-mount. I used a brushless motor, plus a home-made delrin adapter plate to allow the use of an E-flite brushless stick mount. Mountain Models should also consider updating their instructions to match kit contents better- the instructions state Doculam covering is included with the kit, but it wasn't in mine. Note I didn't mind, as I didn't intend to use that material anyway.

I also had some trouble getting the CG to line up right- perhaps I used too heavy of a covering or excessive glue in the tail. I'd also recommend NOT using CA to fasten the canopy in place- the CA fumes deposited white residue on the inside of the canopy and on my pilot.

However, the end result looks good and flies great. Extremely acrobatic, and I'm still using the recommended low rates. High rates are insane, I'll have to get in some serious practice before I'll be able to fly using them. I also really like how the transparent yellow wings look when in flight.

Components Used:
  • Spektrum AR6110 receiver
  • 2213n 800 kV motor- I originally intended on using this 1200kv motor (previously well used on other aircraft), but accidentally broke several wires when installing the motor. I had this 800 kV motor as a backup for my Tricopter motors, but thought I'd put it to good use here.
  • APC 10x4.7 SF prop. This only gives about 10amps- I will try larger diameter and higher pitch to try and bring this closer to 18amps at full throttle. I'm thinking an 11x7 SF might be a good choice. Even with the 10x4.7 prop the aircraft has nearly vertical performance, and nice long flight times.
  • Turnigy Plush 18A ESC
  • 4x HXT900 servos
  • Rhino 750 mAh, 3s, 20c lipo batteries
  • Coverite transparent yellow iron-on covering
  • Blue econocote iron-on covering

E-Flite Funtana 300
I purchased this acrobatic foamie from Mark last year. It had an unfortunate crash this past winter- nose-first into the ice. I patched it back together with balsa, but it really hasn't flown the same since because of the added weight from all the balsa and epoxy patches. When I built the Mountain Models mini-Flash, I removed the Funtana's Spektrum AR6110 for the new plane. I did purchase a few of Hobbyking's new RA61E 6 channel 6110 knock-off receivers. I was a little skeptical about their quality so I certainly won't put one in a balsa model, but it was a perfect receiver to put in the Funtana which is now somewhat disposable. I flew it for a couple batteries last night, and the cheapo receiver seems to bind and function just like the AR6110 origional, but only 25% of the cost.

Friday, May 20, 2011

Monday, May 9, 2011

Tricopter Success!


I'll re-post my settings- I believe they've changed from the last setting summary I posted. Anyway, I'm very close to having the tricopter ready to fly some arial photography.

It is fairly close to stable flight. It still isn't as steady as I'd like, and I need to put in a lot of "up" elevator trim to keep it from putting the nose down and accelerating away, even with the CG set to the exact midpoint of the three rotors. One puzzeling obervation is that the craft seems exhibit the pitch problem less with the CG "behind" the centerpoint of the three prop booms. I'd expect the opposite to occur.

I've also had to do quite a bit of reading on RCgroups to try and understand the tricopter setup, in particular gyro gain setup. (and don't hesitate to correct me if my observations below are incorrect!)

First of all, there are several gyro adjustments available:

1) gyro max travel (screw adjustment)
2) gyro time delay (screw adjustment)
3) gain control (electronic adjustment through separate rx channel)

You adjust the gain by modifying the output of a channel of your RX. Basically, it uses the same PWM signal as servos and ESCs. If you send the gyro a 0% signal, that's max gain. A 100% signal is minimum gain. However, if you send the gyro a signal of 50% or more, it'll be in heading hold mode rather than rate mode. You want the tail servo on heading hold mode and the other three gyros on rate mode. Heading hold mode will try and move the aircraft back to the origional orientation, and rate will simply react to counteract an input acceleration.

Since the tricopter uses two "blocks" of gyros- one three gyro block for the rotors and one block for the tail, you need two RX outputs to control them. I attached the rotor gyro gains to the standard gain channel on the RX (thereby using the heli gyro menu item), then I used the throttle channel for the tail rotor gyro. All confusing as heck and not at all intuitive.

I'm thinking that the following changes will help with flyability:
  • Changing from a 10x5 prop to a lower pitch- this should give the gyros more control as the ESC's will have a smaller output change in pitch inches per prop revolution per ESC step
  • Adding a rear skid so the tail rotor yaw servo doesn't smack the ground on each hard landing
  • Try moving the battery even farther back
  • I'd also like to add more of a visual reference as to which end of the craft is the "front"

Wednesday, May 4, 2011

DIY Sunrise alarm clock

Nice implimentation of a do it yourself sunrise alarm clock. It's a little more from the ground build than I'd do, but it's nicely done.

http://sunrisealarm.sourceforge.net/