I also captured a short short of John getting the T-28 into final pattern and landing, shortly before it's final, ill-fated flight.

Monday, March 29, 2010
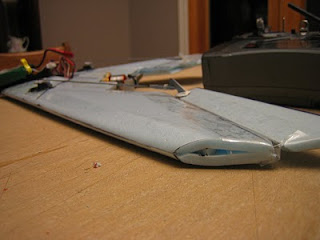
Aftermath of Johnny K's T-28 Crash
I won't say much, because I'm sure John will elaborate, but 100+ MPH speeds and batteries weighing 4-5x what the stock batteries weight eventually caused his T-28's wing to fold. The aircraft did a very nice axial roll into the ground at full throttle and a high rate of speed. The results are shown below. Nothing was moved in the photos after the crash.

 The photo doesn't quite do the crash justice, there was a literal cloud of debris after impact!


 5s 3000mAh LIPO battery- slightly shorter than stock!
 John demonstrating the folded wing.
 Dented LIPO battery after the exterior covering was removed. Amazingly, the battery did not rupture or catch fire.


Sunday, March 28, 2010
Micro-Wing 1-4th flight and Death
First flight, I had the Micro-Wing on high rates- I was worried about not have enough control throw to keep everything under control during the big unknown after the first launch. So, on a gusty spring day I pushed the throttle forward to full throttle and tossed it skyward. And immediately into a nice, over-correcting spiral into the ground. Luckily no visible damage. I immediately followed it up with several other flights after reducing the control rates. John took video so there may be a youtube video posted later.
It seemed to fly really well- and much faster than I expected. Unfortunately between the gusty wings and one of the elevon clevises coming loose, I had multiple hard impacts straight into the ground. The foam eventually tore right at one of the 90 degree corners in the propeller pocket. I kept on flying it after repairing the tear with tape. But, by this point it was pretty dented up from multiple hard impacts and wasn't flying very well. So I kept on flying it until the motor mount tore out and wasn't repairable with packing tape. I suppose that is the big advantage of really cheap, easy to make airplanes.
I'm definitely going to build another, but with some slight changes:
- curved corners in the propeller pocket to eliminate that stress concentration / tear point
- Sand / cut the trailing edge thinner before I fold it over, to make the completed, folded wing trailing edge thinner and closer to the thickness of the elevon
- Make a more durable motor mount
- mount the ESC / receiver in the wing before folding to reduce the amount of cutting required to the outside skin & foam main spar
Thursday, March 25, 2010
Micro-Wing is ready for Flight!
This folded blu-core wing concept was just so cool I had to finish it up. It'll be ready to fly on Friday for sure. It was actually pretty easy. Started at about 8:30PM, and now at just after 11:15PM it would be flyable if it were light out. Granted it isn't painted, but other than visibility issues it should be ready to fly. I really like how the folded blu-core forms a psuedo-airfoil shape. It'll be interesting to see how it flies. If I get a chance I'll weight it tomorrow pre-flight. If the flight characteristics are even OK it should be a rocket. It feels much, much lighter than either the F-35 or the short-lived trainer the powerplant was in.


Another wing project
I decided to build another flying wing- this time as a craft I could use some old parts from my now-defunct F-35. The F-35 was ok, but I think my powerplant wasn't large enough. I might build another with a more powerful motor setup and also try and adapt the KFM airfoil series to try and get better performance out of it.
I found an interesting set of plans on RCgroups: http://www.rcgroups.com/forums/showthread.php?t=497083
This describes how to build a 31" flying wing from flat blucore foam. It's basically a $5 wing. But, this seems a little large for the parts- the motor in question could barely push around the F-35 and that wasn't a large aircraft. I'm going to scale it at 65%, targeting a finished wingspan of 20".
Maybe it'll be ready for a first flight at Josh's house Friday night...
Monday, March 22, 2010
Hot Wire Cutting Note
Another note with the hot wire- I could have gotten a better cut quality, however with the higher voltage power supply the wire expanded longer than what my spring could accomidate, so I lost tension. During cutting I had to be pretty careful to get as good of a cut as I did. I need to rework my fixture to allow a longer spring for my next round of cutting. Or, what would work better would be to transition to a fixture that uses two long metal rods to hold the wire, which is what most people use online for large wing core cutting anyway.
Sunday, March 21, 2010
Speedwing Mark II Foam Cutting
Today I finally started cutting foam for Mark II of the speedwing design. I used John's 30 volt power supply- that got the wire cookin' and it cut through the foam like, well, a hot knife through butter. After cutting the wing sections I tried a number of variations on battery hatches, and I wasn't able to get one to satisfy me. For the hatches I used the band saw as it was easier to get perpendicular cuts through the foam. In the process I made a LOT of scrap foam:

I finally decided to create a new fuselage center section. Each wing half will be bonded to the fuse then the joint reinforced with carbon or spruce spars. After cutting the fuse blank I carefully rounded it using a belt sander.


I'm planning on making a motor mount tray to allow easy interchange of the two possible motors- a 3200kv, and a 1400 kv. In both cases I'll be running a 3s or 4s battery. No 5s or 6s for me!
At the end of the day, it looks like my concept has morphed into a near copy of the Parkzone Stryker. Except it'll probably be a) much more time consuming and b) may not fly as well. But, no matter what, I'll have been an interesting, educational project.
Monday, March 15, 2010
Hot Wire Cutter, Part III
Tonight I added a new, higher rate compression spring. That seemed to do the trick- the cutter now makes nice smooth cuts. However, now the issue seems to be wire temperature- it'll cut longer sections, but it seems to struggle a bit. With the existing 12V 3A power supply I'll have to go very slowly when cutting the wing sections. Perhaps I'll have to borrow a larger power supply from my competitor...
Monday, March 1, 2010
CG & NP For Speedwing
I've added some more information to the Speedwing solid model, and using the neutral point formula in the "basic design of Flying Wing models" website, the NP will be about 8.35" back from the leading edge of the wing root. In reality the NP will likely be farther forward, as the formula assumes the prop cutout space will also be lifting wing surface which is not the case.
Solidworks says the CG will be about 6.4" back, so we're good to go. The 1.94" difference between the two will give plenty of slop to account for paint, fiberglass, etc which may move the CG back towards the NP. As shown in the prototype the CG MUST be ahead of the NP otherwise it will have very undesirable flying characteristics. Below is a screenshot from Solidworks. The pink circle is the estimated CG location, and the vertical dotted line intersects the calculated neutral point.

Solidworks says the CG will be about 6.4" back, so we're good to go. The 1.94" difference between the two will give plenty of slop to account for paint, fiberglass, etc which may move the CG back towards the NP. As shown in the prototype the CG MUST be ahead of the NP otherwise it will have very undesirable flying characteristics. Below is a screenshot from Solidworks. The pink circle is the estimated CG location, and the vertical dotted line intersects the calculated neutral point.

Subscribe to:
Posts (Atom)