This post is actually a little out of order- I actually did this before rebuilding the Z-axis.
After doing some initial aluminum cutting and also running into some size limitations with the stock Shapeoko2, I decided I need to upgrade the machine to make it both a) larger and b) stiffer.
Inventable's X-Carve has a number of parts that are bolt-on upgrades that are compatible with the Shapeoko 2. The first I purchased was the
improved DC Spindle mount. This provided a much-improved interface between the DC spindle and the Z-axis slide- both improved rigidity and alignment. It's machined from a single aluminum extrusion and black anodized.
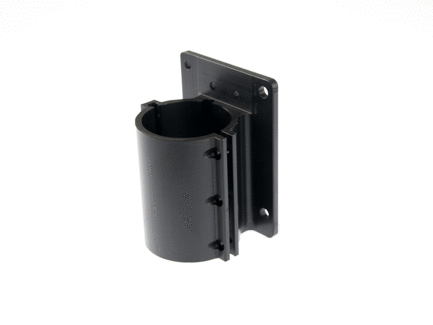 |
| DC Spindle Mount |
The second upgrade I purchased was the
X-Carriage Extrusion. This was definitely a huge upgrade over the stock Shapeoko2 X-Carriage. The stock x-carriage is an assembly of plates bolted together with a ton of spacers and washers- it works, but the improved part is one massive extrusion. It should prove to be much stiffer in actual use.
 |
X-Carriage Extrusion
Installation of the upgrades was pretty straightforward. The entire Shapeoko2 X axis needs to be disassembled. The wheels and stepper motor can be attached to the X-Carriage. Then, the X-carriage extrusion is slid over the X-axis Makerslide extrusions.
|
 |
| X-Carriage assembly in process. |
Once the X-axis is re-assembled, the Z-axis with the new, improved DC Spindle mount can be bolted on and everything aligned.
I also took the opportunity to expand the stock build surface using new makerslide and some 8020 extrusions I purchased from an industrial salvage place.
 |
| Installing electrics on a board attached to the bottom of the frame |
 |
| New, Super Beefy 8020 Frame, laid out but not yet squared |
 |
| Just about ready to bolt together |
 |
| Squared up and bolted together. |
I used the stock 500mm x 500mm wasteboard, then added a new wasteboard I cut from 1/2" MDF. I did buy a set of 5mm threaded inserts to add hold downs to the new section.
 |
| New wasteboard cut from 1/2" MDF and hole locations marked |
 |
| Holes cut and M5 threaded inserts added |
 |
| New Wasteboard & Y axis makerslide braces in place |
Assembled and ready for first part- a new faceplate from 1/8" MDF:
 |
| Cutting faceplate for E-stop and spindle RPM control |
 |
| Faceplate cut & spray painted silver |
 |
| Finished, assembled and ready to go |


Jeez, so technical! It always amazes me when people are able to figure this stuff out on their own. It is truly an astonishment. How long did it take you to finish this project? I hope you post more pics from other projects as I always get a kick out of reading them. Take care and good luck to you!
ReplyDeleteBrandi Bradley @ Rotax Metals
Following other people's projects always helps for me. I always have a project or two in process, but it's tough to find time to even partially document them online.
Delete