Monday, September 9, 2013

MendelMax 1.5 Stepper Motor Upgrade - no more skipped steps!

Ever since the first test prints on my MendelMax 1.5 reprap 3D printer, I've been struggling with skipped steps and layer mis-alignment in my X and Y axis. I've spend much time getting my X and Y axis as smooth and friction-free as possible, upgraded the stepper drivers, and adjusted the acceleration and jerk settings. These all helped, but nothing completely eliminated it. A couple weeks ago I finally decided to try some different stepper motors.

The motors I originally built the machine with were sourced from a industrial salvage yard, and didn't come with any sort of specifications other than they were a NEMA 17 case size and bipolar. (4 leads) I did see someone else's MendelMax with "store bought" steppers and I was shocked at how much longer the cases were and how fast he could get the X and Y axis to accelerate.

So, finally I decided to bite the bullet and purchase a pair of steppers from www.lulzbot.com. I've purchased other items from them in the past and they've always had good quality parts. I also bought a 0.35mm nozzle for the extruder as well. The 0.5mm I started with originally seemed "too big", and the 0.25mm I tried next was "too small". I was hoping the 0.35mm was "just right."

New Stepper motor specs:
  • Step angle: 1.8°
  • Holding torque: 55 N.cm
  • Rated voltage: 2.8V
  • 2 phase
  • Resistance per phase: 2.8?,±10%
  • Inductance per phase: 4.8?,±20%
  • Operation temp range: -20°C ~ +50°C
  • Wieght: 0.365Kg
  • 4 AWG22 lead wires (ends are bare and need connectors)
  • 5mm D-shaped motor shaft

Original motor on the left, new motor on the right
 As you can see, the new steppers are much longer than my original steppers. They proved to have a corresponding increase in torque.

The combination of the new X-Y steppers and 0.35mm nozzle has been great so far. No issues at all with step skipping- the nozzle just blasts through drips during traverses across the part during prints. The printed parts also seem to be more accurate and have cleaner details. I did slightly adjust the voltage going to the X and Y axis using the standard procedure without any trouble. Both Z-axis and the extruder stepper motor are still the original small steppers. I might upgrade the extruder stepper at some point in the future, as I've noticed it skipping steps occasionally. The Z-axis steppers work just fine though.

Swiffer replacement part
One of the first parts I printed was a new, improved design I modeled for a swiffer replacement part. (found on Thingiverse here)  It's a challenging part because of the internal thread to engage the swiffer handle- it requires clean bridging and good accuracy for the threads to fit correctly. The part fit great, much better than previous attempts. This is good because our toddler loves to swing it around and break this particular part. I printed the last attempt using a 80% fill, hopefully that is strong enough to last a while.

New Herringbone Gears
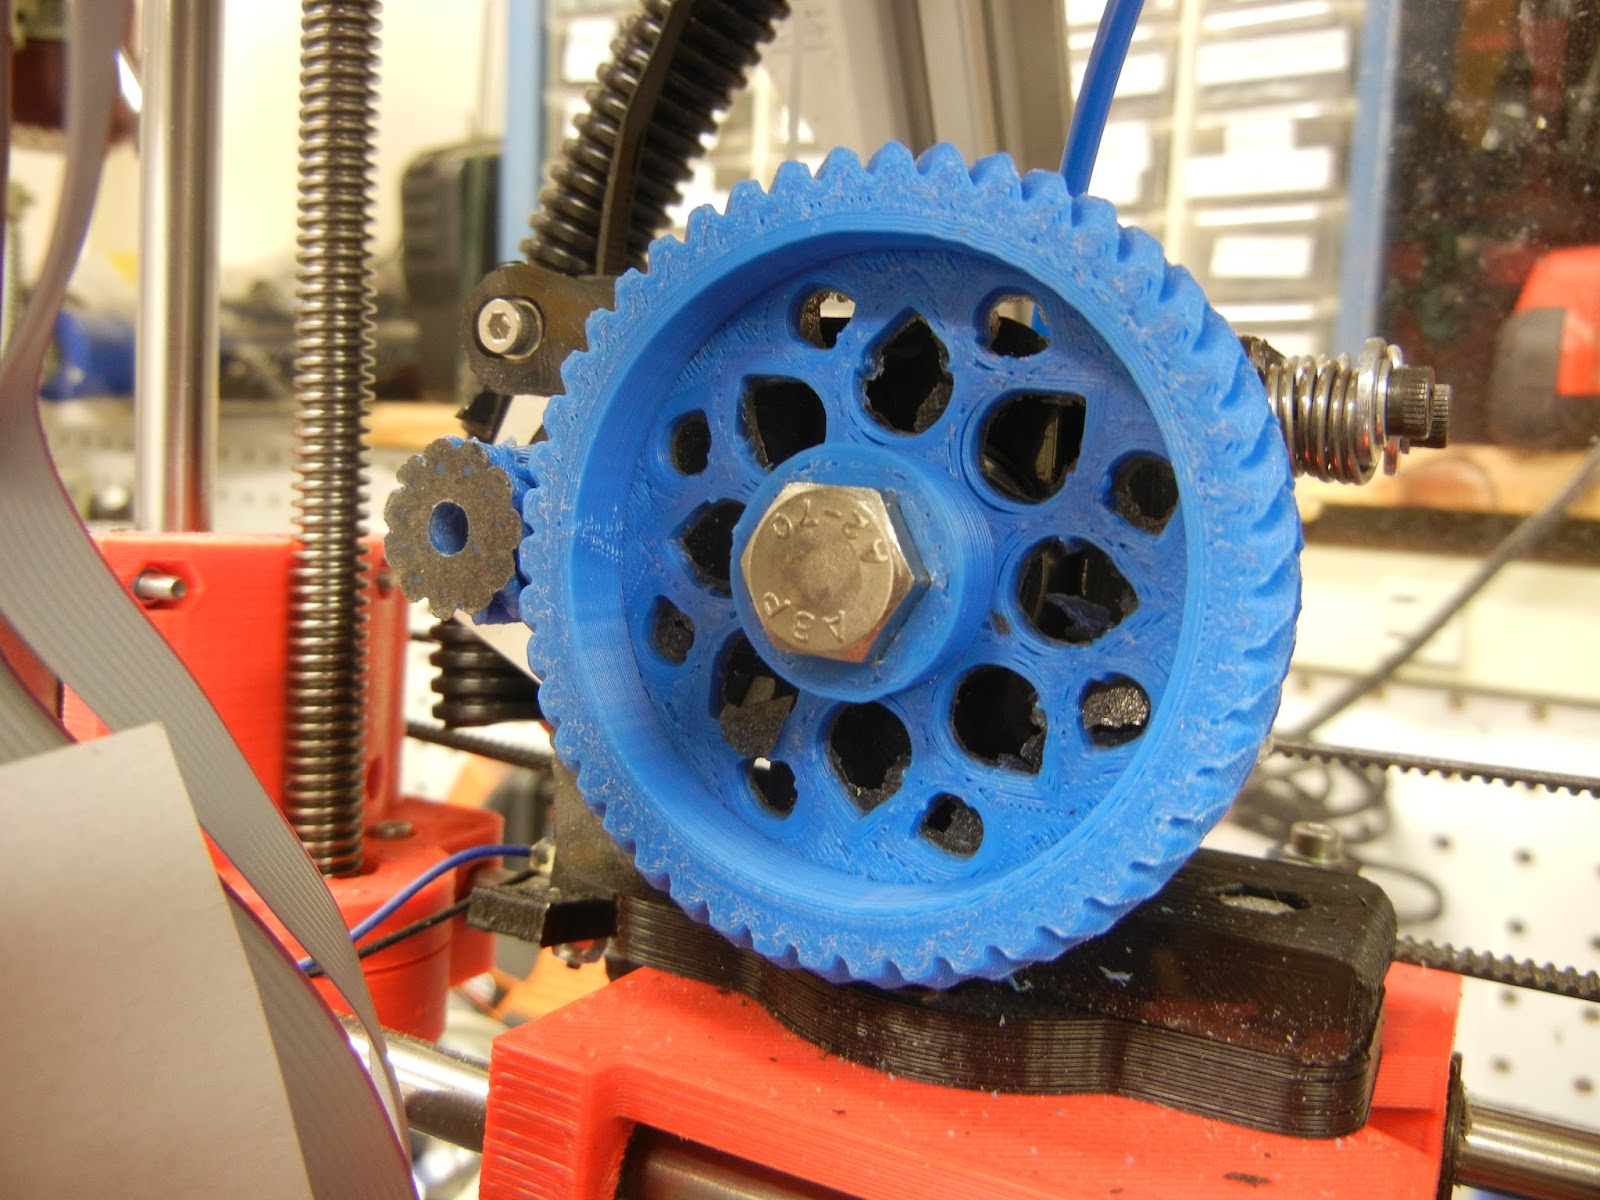
Next up was to upgrade the gears on the extruder. The original straight cut gears were getting noisy with a lot of backlash during printing. I chose to print these Herringbone gears off of thingiverse. They printed very well, and easily assembled. The nut trap in the small gear was very precise, and the nut dropped right in- something I had trouble with previously. The new gears run well with little or no backlash.

I'm considering upgrading the extruder to a belt drive unit and getting rid of the printed gears entirely. A belt drive would have zero backlash, and wouldn't wear out. The 00str00der on thingiverse looks interesting. The only problem is the belts and GT2 timing pulleys are tough to find, particularly at a reasonable price.


Wednesday, September 4, 2013

Octave 3D Printer Enclosure mini-Review

After trying several home-baked options for our lab Afinia 3D printer, I purchased a Octave 3D printer enclosure from www.octave.com. We wanted some way to control the air currents and air temperature around the printer. Our lab can be drafty and prone to big temperature fluctuations depending upon how hard the AC is blowing and if the sun is particularly strong. The Octave enclosure seemed like a very reasonably priced option.
Afinia happily printing away in its new home

The enclosure arrived pre-assembled in a big cardboard box within a few days after ordering. I think I was fortunate that I ordered it quickly after seeing the advertisement- Octave's website says they are currently back-ordered now.

The enclosure is a nicely designed ABS plastic box, with a clear plastic door. There is a slick trap door on the top for loading new filament into the extruder head, complete with a slot allowing for free motion during printing. My only nitpick would be to make the door another inch or two wider to the left, to allow for easier filament loading when the print head is in the full left "home" position.

Super slick top trap door & filament slot


Another door in the back of the enclosure allows for easy access to the Afinia's power and USB ports.

The Afinia's feet fit into sockets on the enclosure base plate, keeping it solidly in position during prints. Rubber feet on the bottom of the enclosure keep it anchored to your desk top or bench top.

A fan with charcoal filter ventilates the box, and a set of LED lights inside the enclosure keeps your print job brightly illuminated. I was a bit disappointed that there was no on/off switch for the fan and lights. To turn them on and off you must plug/unplug the included AC power adapter. I called Octave, and they said future versions would include an AC adapter with a switch, and would send me one when it is available.

The enclosure didn't include a spool mount. But, Octave makes 3D models of some mounts available on their website for download and printing. Another very minor nitpick is the arm that holds the "outboard" end of the filament tube doesn't fit the filament quite right- the filament doesn't "snap" into the slot at the end of the arm. The slot could stand to be a few thousands of an inch narrower, with a larger interior thru-hole for the filament. If this proves to be an issue I'll model a new arm and post it on thingiverse.com.

Approximate 30 degrees C interior temperature (blue tape holding thermocouple wire in place)

 Overall, I'd recommend this enclosure for purchase if you own an Afinia 3D printer. I can't yet say if it measurable improves print quality, but seems like it should.

Pros:

  • Nicely designed & constructed unit. It seems to be good quality and should easily last the lifetime of your printer. 
  • keeps interior at a fairly constant temperature
  • LED interior lights a nice touch
Cons:
  • No on/off switch (yet)
  • Filament arm design could use a little more polishing


Wednesday, August 7, 2013

Xtracycle Kickback Kickstand Fixes

I've had the Xtracycle Kickback kickstand on my Surly Big Dummy for a few years now. While it does a great job of holding the bike upright when parked, it's full of small annoyances. As lots of other people online have noted, these small issues seem pretty big when you consider the high price for what is essentially a kickstand.
  1. The plastic feet on the bottom of the Kickback wear out really fast, and soon your bike is being held upright by a pair of aluminum tubes, which can scratch the heck out of whatever you are parking on. 
This is an easy fix- suggested by someone on the Xtracycle yahoo group, rootsradicals. Head over to your favorite hardware store and buy some 7/8" rubber chair feet. They slip right on and hold pretty securely. 

 
2. The Kickback makes really annoying clunking / clacking noises when you hit a bump, jump a curb, or try to do "fun things" with your cargobike. 

This is a bit bigger problem. For some reason Xtracycle didn't use a spring design like most motorcycle centerstands or regular bicycle kickstands- they just used a regular extension spring encased in a nylon bag. As a result, when the Kickback is retracted, the spring force holding the kickstand in place is pretty low, allowing it to flop around and bang into your bike's frame.

I've been looking at some other spring options and possibly even designing some sort of over-center mechanism, but haven't finished anything that is ready for road use. However, there is a simple fix to drastically reduce the amount of noise the Kickback makes when it flops around.

Simply mount a rubber bumper to the underside of where the factory kickstand mounts. It seems to work pretty well. You can still hear it banging around after a curb drop, but it is much, much quieter. Another option might be to put one of the rubber chair feet onto the steel stub on the kickback. 

Materials Needed:
  • Rubber foot with thru-hole, appropriate size
  • Screw, nut, and washer of appropriate size to fit through rubber foot
  • Threadlocking compound


Materials Needed
Bold the rubber foot to the bottom of the frame, using the same mounting hole as the factory kickstand.

Rubber foot mounted, Kickback down

Rubber Foot Mounted, Kickback up


Saturday, May 25, 2013

Z-Axis Endstop, Micrometer Head Adjust

I was still not having good luck consistently getting the z-axis endstop to zero my MendelMax 1.5 rep rap Z-axis in the right place. Using a 4/40 or M3 screw just didn't provide the vertical resolution that I needed to really zero in the axis. So, I decided to really do it right and use a micrometer head to provide extremely fine adjustments.

I found this great Mitutoyo micrometer head on e-bay- a $150 unit for $20, shipped. Second hand industrial surplus is great.

Mitutoyo 148-811 Micrometer Head
So, instead of trying to fumble with turning a unlocking nut, then a screw only a couple degrees, then locking the nut again- all you have to do is twist the dial and watch exactly how far you move the tip up or down. Very easy.

I updated the Z-axis screw holder to accommodate the new micrometer head and printed it out.

Mount for Micrometer Head
 Everything seemed to fit well, and I uploaded the finished design to thingiverse, download the files here

Everything Mounted and ready to go

Front view

So far it seems to work great- it's a lot easier to dial in the nozzle height. Some people claim that adjusting this in software is easier, but for me twisting a knob and immediately running the program again is the most convenient way to go.

To give it a try I ran the old standby- the 5mm calibration object pyramid. It looks better each time. I'm still puzzling at how to get the top block square, and the bridging tests aren't super clean. (visible on the back of the pyramid)

5mm calibration object test

Back of Pyramid
Maybe adding a fan would clean up the bridging and some of the odd sidewall shrinkage?

With the hot-rodded printer, I designed and printed a replacement part for the swiffer. The piece that connects the handle to the mop head broke. It's a challenging part- it has a large internal ACME screw thread to join it to the handle. To my amazement it threaded right on, no cleaning of the threads needed. So far it seems to work just like the "factory" part. Download this part here. 

Swiffer with new head mount

Closer view


Wednesday, May 1, 2013

Z-Axis Endstop Switch Update

I'm still having a challenge getting the nozzle height correct for prints- and part of it seemed to be some inconsistency in the Z-axis homing / endstop. The stock Z-axis endstop switch is a standard microswitch. Doug suggested that I remove the spring arm from the switch. Doing this should remove at least some variability from the Z-axis homing cycle.

Z-Axis endstop microswitch with metal spring lever attached

Spring Lever "Removed"

Switch back in position and ready to go
So far no definitive data on if this actually improves anything, but I don't see how it can hurt.

Tuesday, April 30, 2013

0.25mm Nozzle, Cartridge Bearings, and Pluto.

I purchased a new nozzle for the printer in an attempt to get higher resolution parts. My original nozzle was a Lulzbot Budaschnozzle 1.3, 0.5mm diameter, which I don't know if they even sell as a stand-alone part anymore. It worked fine, but seemed to make a mess of smaller parts and liked to ooze a lot. I thought I'd go the other direction and went to the smallest nozzle Lulzbot.com sold- a 0.25mm.

While I was on the lulzbot site I noticed they really upgraded their hot end- their new 2.0 version looks really nice- a machined stainless steel backer plate and aluminum heatsink. Much more industrial looking than the older version I purchased only a few months ago.

Since the new 0.25mm diameter nozzle only puts out 1/4 as much plastic per pass as my original 0.5mm nozzle, build times are longer, but the smaller output filament produces a much finer quality part. It also seems to ooze much less when heating and traversing than the original 0.5mm nozzle. I've heard clogs can be an issue with smaller nozzles but I haven't seen that yet. The new nozzle was a snap to install. I was worried about all of the solidified plastic on the inside of the old nozzle making it impossible to remove, but it came off without any trouble.

As long as I was trying to further improve print quality, I thought I'd further reduce free play in the Z-axis 3/8" ACME threaded rods. The bottom is relatively fixed by the stepper motors and the flex couplers. The X-ends attach to the rod via two large brass ACME nuts, but those nuts have some side-to-side free play. During Z traverses the top of the rods can and do trace out an orbit. This must have some effect on Z-axis precision. It's probably very minor, but why not try to reduce it as much as possible. I was able to find some nice cartridge bearings with the correct ID at D&S Machined Products for $2.50 each. NTN R6ZZ/LO14QC. These fit very nicely over the 3/8" threaded rod.


I was planning on designing and printing a slick bearing retainer, but then my father-in-law suggested I simply hot glue them in place. How can you argue with that? Quick, easy, and it'll supply a tiny amount of flex to prevent binding.

Right Side upper Z-axis bearing hot glued in place


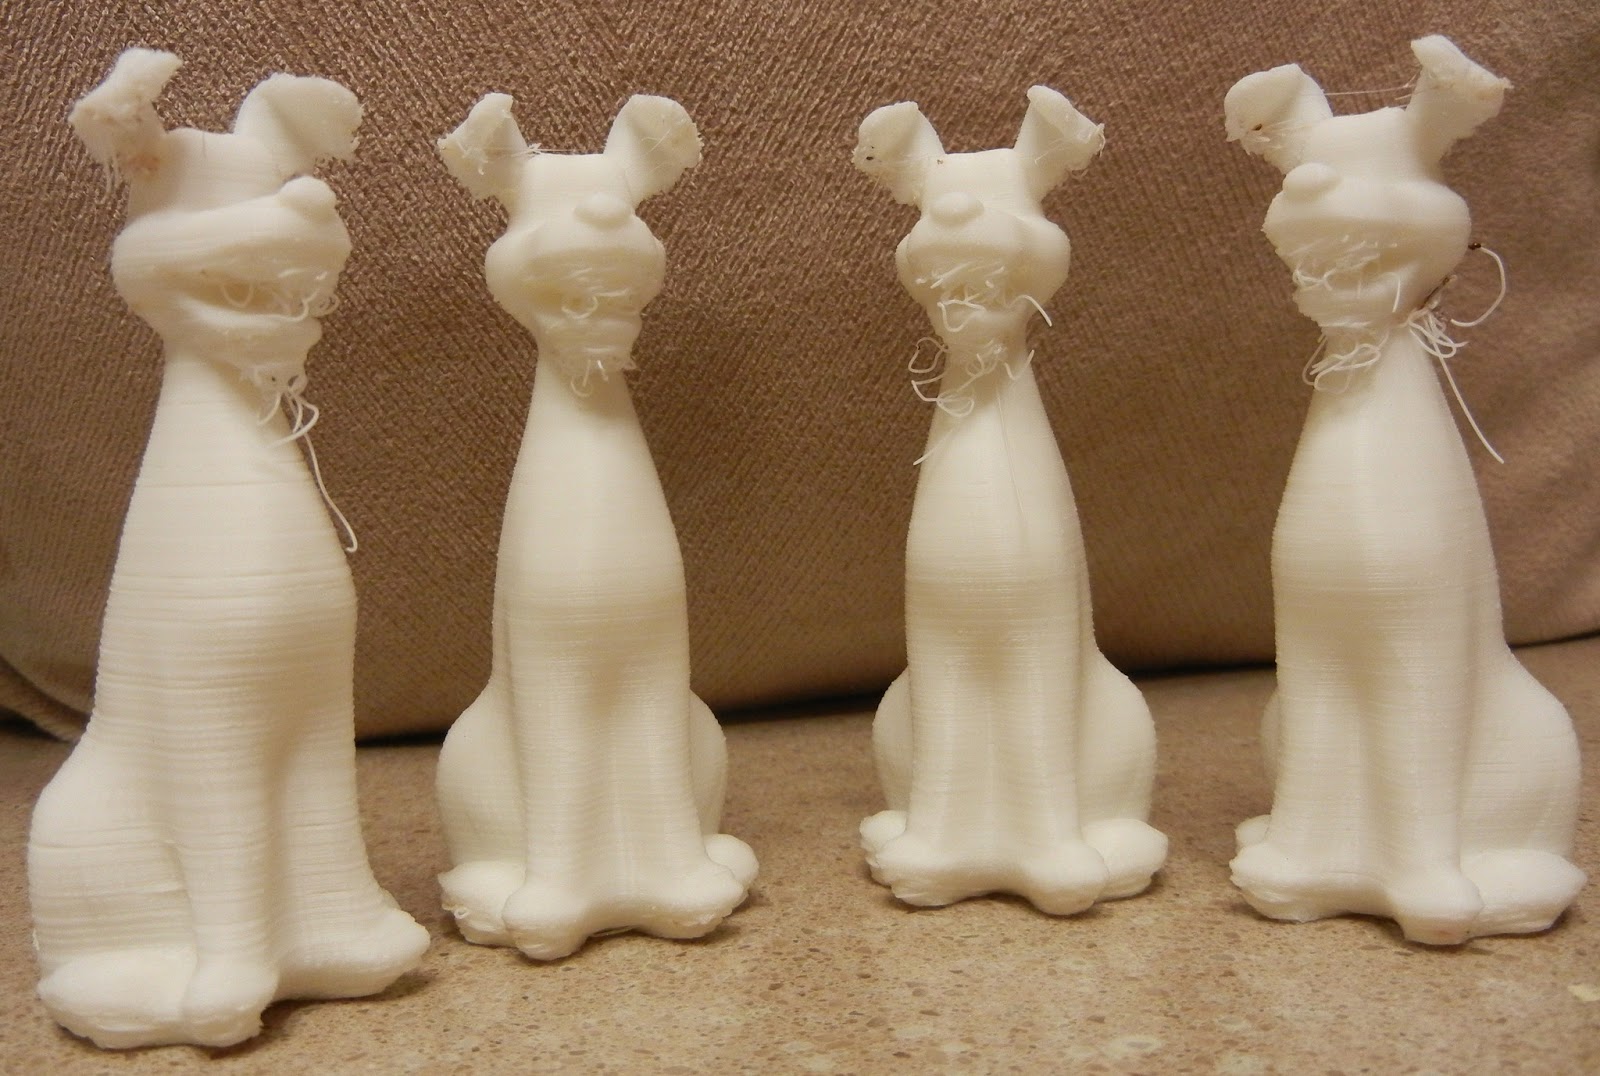
For a test of these two improvements, I printed a few copies of the "Pluto" dog off thingiverse. It's a nice size, has smooth compound curves, and some really tough overhangs for the ears and mouth. In short, a good test for trying to improve print quality.

The 4 Dogs, numbered left to right
Dog #1, far left, is 0.2mm layer height with a 1mm Z-lift. I've been using a 1mm lift since the beginning since I was having all kinds of problems with the nozzle hitting ooze piles, jamming the stepper motors, then ruining a print.  In this dog you can see some variability in layers, some gaps visible, etc. Lots of stringies from the bottom of the mouth and ears also.

Dog #2: Since the new nozzle doesn't ooze nearly as much, I thought I'd take a chance and get rid of the Z-lift entirely. That made a huge difference- note how uniform and clean each layer is. No issues with skipping steps either. I also reduced the Bridge Flow Ratio (BFR) from 1.0 to 0.95 to try and improve the mouth and nose details. That didn't seem to help much, this dog still had bridging challenges on the mouth and ears.

Dog#3: The final two dogs were meant to fix the bridging entirely- #3 has a BFR of 0.85

Dog#4: BFR of 0.75. Minimal effect.

A fan might be required to get this dog to print nicely. Otherwise a nail file and wire clipper will clean it up nicely.

How about trying a vapor polish? Just don't leave it in there too long like I did. It's also a smart idea to let the vapor chamber fill first, before inserting your part. Otherwise the bottom of the part gets over-polished and the top gets under-polished. Here is what it looked like after 45 minutes:

Melted Dog!
 The bottom of the dog was very, very soft and had partially collapsed and the top still looked good.


Next, now that small part performance is starting to look pretty good, I thought I'd actually do something useful with the printer. I installed some under cabinet LED lights from amazon.com. These were very nice- decently warm color, and easy to install. However, I needed a better solution to fasten the wires in place to the bottom and inside of the cabinets. Neither Home Depot or Lowes had appropriate wire clips or staples, so I thought I'd design and print my own. All of the commonly available clips are made for coax cables, CAT5, romex, etc.


These custom clips securely clamp the wire in place and attaches using a #6 flat head screw. The .STL file, part model, and dimensions are available now on thingiverse.


tags: mendelmax 1.5, rep rap

Tuesday, April 2, 2013

More MendelMax 1.5 reprap improvements....

The original vinyl tubing Z-axis connector was showing it's age- starting to crack and slip. The version of MendelMax 1.5 I built uses a 3/8 inch ACME thread Z-axis threaded rod- so it's not easy to find a drop-in replacement My first try at an improved Z-axis connector was to design and print one. This connector can be found on thingiverse.

Printed 3/8" ACME to 5mm Stepper connector, installed

Printing parts with the new connector
The new connectors didn't work quite as well as the vinyl tubing- and seemed to introduce a good wobble to the Z-axis threaded rods, and thus made the parts print with irregularities in the layer thickness.

Unfortunately nice machined aluminum couplers are not available to join 5mm shafts to 3/8" ACME rod. I was able to find some very inexpensive 5mm to 8mm aluminum flex couplings on e-bay. Then, a friend helped me turn down 0.5" of the shaft end to 8mm to fit the couplings.

3/8 ACME rod with end turned to 8mm
Coupler Installed
I've also been fighting part warping. I thought one way to combat this would be to control airflow, and to keep the air around the printed part still and fairly warm. I found some thin acrylic sheet at the local Lowe's hardware store. It cut very nicely by scoring it with a knife and also with a bandsaw.

Cutting Acrylic Sheet
Material Detail

Draft Guards installed